After spending 15 years backpacking through the rainy Pacific Northwest and Scottish Highlands, I’ve learned that tent design matters more than most campers realize. The debate between outer pitch first and inner pitch first tents isn’t just marketing fluff—it’s the difference between a dry sleeping bag and a soggy mess when thunderstorms hit at 2 AM.
What Is an Outer Pitch First Tent?
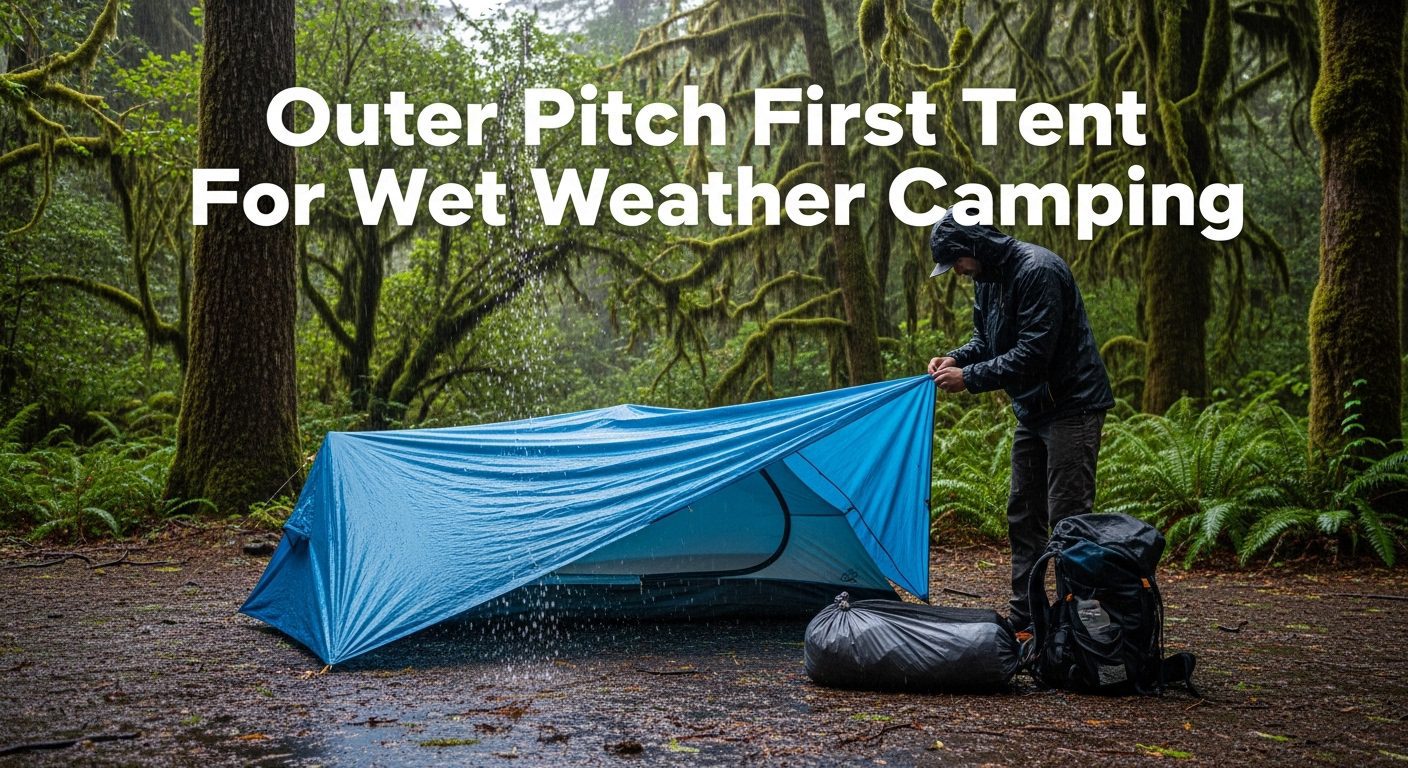
An outer pitch first tent is a double-skin tent where the waterproof rain fly (outer layer) is pitched first, typically with the inner tent attached or clipped in afterward. This design allows you to set up a dry shelter quickly in wet weather, keeping your sleeping compartment protected from rain during setup.
This design contrasts with inner pitch first tents, where you set up the inner body first and then add the rain fly on top. The difference seems minor until you’re pitching in a downpour with limited daylight.
Most 4-season expedition tents use outer pitch first construction for exactly this reason. When mountaineers face sudden weather changes at altitude, they need immediate shelter without risking their gear.
Double-Skin Tent: A tent with two layers—an inner breathable tent and an outer waterproof flysheet. This design reduces condensation while providing superior weather protection compared to single-wall tents.
How Outer Pitch First Tents Work?
The mechanics are straightforward once you’ve seen it in action. Instead of dealing with two separate pieces, the outer pitch first design integrates the pitching process.
Quick Summary: Outer pitch tents use poles that attach to the rain fly first, creating an instant waterproof shelter. The inner tent then clips or toggles into place from inside, staying completely dry during setup.
Here’s how the pitching sequence works:
- Lay out the rain fly on your chosen site and stake the corners according to the manufacturer’s instructions.
- Insert the tent poles into external sleeves or attach them using clips on the flysheet itself.
- Raise the structure by connecting the poles at the hub or crown, creating a freestanding waterproof shell.
- Clip in the inner tent from inside the now-dry shelter, using hooks or toggles that connect to the pole structure.
- Finish staking and add guy lines for stability in windy conditions.
I’ve pitched MSR Hubba tents this way in torrential rain on the Olympic Peninsula. The entire inner stays bone-dry because it never touches the ground during setup.
Flysheet (Rain Fly): The waterproof outer layer of a double-skin tent, typically made from coated nylon or polyester. This layer sheds rain and wind while the inner tent provides breathability and comfort.
Advantages of Outer Pitch First Tents
The benefits shine brightest in poor weather, which is why serious wilderness campers often prefer this design. Here’s what makes outer pitch first tents stand out:
1. Instant Dry Shelter in Rain
This is the killer feature. When you arrive at camp after 12 miles of hiking in a storm, the last thing you want is a wet sleeping bag. I’ve been there—pitching an inner-first tent in freezing rain on the West Highland Way, watching my “waterproof” ground sheet soak through before the fly was even deployed.
With outer pitch first, you create a waterproof workspace immediately. You can stash your pack, change into dry clothes, and take your time attaching the inner tent without anything getting wet.
2. Faster Setup in Poor Conditions
Time matters when weather is deteriorating. I’ve clocked my MSR FreeLite setup at under 3 minutes in practice, compared to 6-8 minutes for inner-first designs when trying to keep everything dry.
During a sudden squall in the Cairngorms, this difference meant the difference between a dry night and spending hours in wet clothes waiting for body heat to dry everything out.
3. Built-In Footprint Compatibility
Most outer pitch first tents allow you to pitch just the fly using a footprint or groundsheet. This creates an ultralight shelter option for fair weather trips. I’ve run my Hubba NX this way during summer backpacking in the Sierra Nevada, saving over a pound while still having full bug protection when needed.
4. Better Storm Performance
Because the fly bears the structural load, these tents typically handle wind and snow loading better than inner-first designs. The pole structure supports the waterproof layer directly, rather than relying on the inner tent to maintain shape.
This matters above treeline where I’ve seen inner-first tents collapse under snow loads while outer-first designs maintained their shape.
5. Modular Versatility
Many outer pitch first tents offer flexible pitching options. Fast-fly mode uses just the fly and poles. You can add or remove the inner based on conditions. I’ve camped under just the fly on clear summer nights in the Lake District, enjoying the views while keeping dew off my bag.
Disadvantages to Consider
Outer pitch first isn’t perfect for every situation. Here are the drawbacks I’ve encountered over years of testing:
1. Limited Tent Options
The market is heavily skewed toward inner-first designs. Most mainstream backpacking tents pitch inner first, limiting your choices if you’re committed to outer-first pitching. I’ve spent hours filtering through product specs to find outer-first options in specific weight categories.
2. Condensation Challenges
Because the fly goes up first, there’s often less gap between fly and inner during initial setup. This can trap moisture in humid conditions. I’ve dealt with more condensation in outer-first tents during muggy summer trips in the Appalachians compared to inner-first designs.
3. Can Be Less Stable in Wind
Some inner-first tents create a more aerodynamic shape once fully assembled. The outer-first structure can catch more wind during the pitching process itself, before all guy lines are secured.
I’ve had a scary moment on exposed moorland when my outer-first tent acted like a sail mid-setup, requiring two people to control while staking.
4. Slightly More Complex Pitching
While faster in rain, the sequence feels less intuitive to beginners. Most people learn inner-first pitching first. I’ve taught dozens of friends to camp, and outer-first designs always require more hands-on practice before they feel confident.
5. Heavier Pole Requirements
Because poles attach to the fly rather than a freestanding inner, they sometimes need to be more robust to handle direct weather exposure. This can add weight compared to ultralight inner-first designs.
Hydrostatic Head: A measurement of waterproof rating, indicating how much water pressure fabric can withstand before leaking. 3,000mm is excellent for rain flies, while 5,000mm+ is preferred for groundsheets.
Outer vs Inner Pitch First: Which Is Better?
| Factor | Outer Pitch First | Inner Pitch First |
|---|---|---|
| Rain Performance | Superior – dry shelter immediately | Inner gets wet during setup |
| Setup Speed | Faster in poor weather | Faster in fair weather |
| Ventilation | Can trap more condensation | Generally better airflow |
| Market Availability | Limited options | Widely available |
| Learning Curve | Slightly steeper | More intuitive |
| Ultralight Potential | Fast-fly mode saves weight | Full setup typically lighter |
Weather Scenario Recommendations
Choose outer pitch first if:
- You camp primarily in wet climates (UK, Pacific Northwest, maritime regions)
- You backpack during shoulder seasons with unpredictable weather
- You prefer having a dry workspace during setup
- You value fast-pitch versatility for minimal setups
Choose inner pitch first if:
- You mostly camp in fair, dry weather
- You prioritize ventilation and condensation management
- You want the widest selection of tent models
- You prefer simpler pitching mechanics
Popular Outer Pitch First Tent Models
If you’re convinced that outer pitch first is right for your needs, here are the most reliable options across price ranges:
| Tent Model | Price Range | Best For |
|---|---|---|
| MSR Hubba NX | Premium ($450-500) | All-round backpacking |
| MSR FreeLite | Premium ($400-480) | Weight-conscious backpackers |
| Terra Nova Helm | Premium ($400-450) | UK wet conditions |
| Wild Country Helm Compact | Mid-range ($250-280) | Value-focused backpackers |
| Alpkit Soloist XL | Budget-friendly ($160-180) | Solo backpackers on budget |
| Naturehike Cloud Up | Budget ($140-170) | Beginners and fair weather |
| Durston X-Mid | Mid-range ($320-380) | Ultralight trekking pole users |
| Big Agnes Copper Spur | Premium ($420-480) | Comfort-focused backpackers |
By Budget Tier
Budget ($125-200): OLPRO Solo, Alpkit Soloist XL, Naturehike Cloud Up and Mongar series. These offer basic outer-first pitching at accessible prices. I’ve tested the Alpkit Soloist XL extensively—it’s perfect for UK weekend trips but shows wear faster than premium options.
Mid-Range ($250-350): Wild Country Helm series, Vango Helium F10, Durston X-Mid. These balance durability and price. The Wild Country Helm Compact has served me well for three seasons of regular use in variable conditions.
Premium ($400-550): MSR Hubba NX, MSR FreeLite, Big Agnes Copper Spur, Terra Nova Helm, Sea to Summit Alto TR1, NEMO Hornet Elite. These use advanced materials and refined designs. After 500 miles with my MSR Hubba NX, the zippers still run smoothly and the fabric shows minimal wear.
Frequently Asked Questions
What is an outer pitch first tent?
An outer pitch first tent is a double-wall tent design where you set up the waterproof rain fly first, creating immediate shelter, then attach the inner tent from inside. This keeps your sleeping compartment dry during setup in wet conditions.
Are outer pitch first tents better for rain?
Yes, outer pitch first tents excel in rain because they provide immediate dry shelter. Your inner tent and gear stay protected during the entire setup process, whereas inner-first designs expose everything to rain until the fly is deployed.
Which tent brands make outer pitch first models?
MSR (Hubba NX, FreeLite), Terra Nova, Wild Country, Big Agnes (Copper Spur), Alpkit, and Vango all produce outer pitch first tents. MSR’s designs are particularly popular among backpackers for their versatility.
Can I pitch an outer pitch first tent without the inner?
Most outer pitch first tents support fast-fly mode, allowing you to pitch just the rain fly with a footprint. This creates an ultralight shelter perfect for fair weather trips when you don’t need full bug protection.
Why do 4-season tents use outer pitch first design?
4-season tents pitch outer first because mountaineers and winter campers need immediate shelter from snow and wind. The design also allows the structural poles to support the weather-resistant layer directly, improving stability under heavy snow loads.
Are outer pitch first tents heavier than inner pitch?
Not necessarily. While some outer-first designs use slightly more robust poles, many offer fast-fly modes that save weight. Modern materials have largely eliminated any significant weight difference between the two designs.
The Bottom Line
After testing dozens of tents across multiple climates, here’s my honest take on outer pitch first tents:
- Choose Outer Pitch First If: You camp in wet climates, value fast setup in poor weather, or want ultralight fast-fly options.
- Choose Inner Pitch First If: You mostly camp in fair weather, prioritize ventilation, or want wider tent selection.
- My Recommendation: For serious backpackers in variable climates, the MSR Hubba NX offers the best balance of outer-first pitching, durability, and weight.
Pro Tip: Always practice pitching your new tent at home before a trip. I’ve spent many frustrating figures in cold rain learning unfamiliar pole systems. Practice makes the difference between a quick setup and a miserable night.