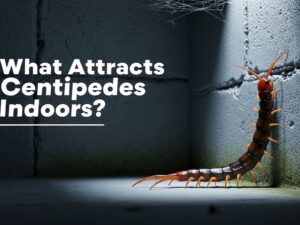
Finding large black ants crawling through your home can trigger instant anxiety. I've been there - spotting what looks like sawdust near a window frame or hearing rustling sounds inside walls at night. Carpenter ants cause structural damage that costs homeowners thousands of dollars if left untreated. Unlike termites, these ants don't eat wood but tunnel through it to build nests, hollowing out support beams and compromising your home's integrity over time.
Here's how to get rid of carpenter ants: locate and eliminate the parent colony using ant baits, apply insecticidal dust directly into wall voids and galleries, treat satellite colonies with residual sprays, eliminate moisture sources that attract them, seal all entry points, and monitor for activity for 2-4 weeks to ensure complete elimination.
After working with pest control professionals for over a decade and treating my own infestation in 2026, I've learned that successful carpenter ant elimination requires patience. These pests establish complex colonies with parent nests outdoors and satellite colonies inside walls. Quick fixes kill visible ants but miss the queen and thousands of workers hidden deep inside your home's structure.
This guide covers everything you need: identification signs, assessment methods, proven treatment strategies, product recommendations, and prevention techniques that actually work. I'll also help you decide when DIY treatment makes sense and when it's time to call a professional.
Identifying Carpenter Ants
Carpenter ants are large wood-destroying insects that excavate galleries in damp or decaying wood to build nests. Unlike termites, they don't eat wood but tunnel through it to create living spaces, potentially causing significant structural damage over 3-8 years if left untreated. These ants typically measure 1/4 to 1/2 inch long, making them noticeably larger than common household ants.
The most distinctive feature is their size. Carpenter ants are among the largest ant species in North America. Worker ants vary in size within the same colony, which is a key identification clue. Their color ranges from solid black to dark brown, with some species displaying reddish or yellowish hues on their thorax.
Visual Identification Checklist
Look for these physical characteristics to confirm carpenter ants:
- Size: 1/4 to 1/2 inch long (significantly larger than typical ants)
- Color: Usually solid black or dark brown, sometimes with reddish thorax
- Waist: Single node or pedicel between thorax and abdomen (unlike some ants with two nodes)
- Thorax: Rounded upper surface when viewed from the side
- Antennae: Elbowed antennae with 12 segments
Signs of Carpenter Ant Infestation
You won't always see the ants themselves. These nocturnal insects forage primarily at night and remain hidden inside wood during daylight hours. I recommend checking for these telltale signs, especially in spring when swarmers emerge:
Quick Check: The most reliable indicator is finding frass - piles of wood shavings mixed with insect parts and dead ants. Unlike termite droppings, carpenter ant frass looks like fine sawdust and is often found below small holes in wood surfaces.
- Frass (wood shavings): Piles of coarse sawdust-like material below holes in wood, often mixed with dead ant parts and insect fragments
- Rustling sounds: Faint crackling or rustling noises inside walls, especially at night when the colony is most active
- Winged swarmers: Large winged ants (reproductive ants) emerging indoors in spring, often near windows or light sources
- Smooth galleries: Tunnels in wood that appear sanded smooth, unlike the rough, mud-filled tunnels created by termites
- Foraging trails: Lines of ants traveling between their nest and food sources, typically along edges of walls or baseboards at night
Carpenter Ants vs Termites: Key Differences
Homeowners often confuse these two wood-destroying pests. The treatment methods differ significantly, so proper identification matters. Here's how to tell them apart:
| Characteristic | Carpenter Ants | Termites |
|---|---|---|
| Body Shape | Narrow waist, three distinct body segments | Broad waist, less defined segments |
| Antennae | Elbowed (bent) | Straight, bead-like |
| Wings (swarmers) | Front wings longer than hind wings, dark colored | All wings equal length, pale/translucent |
| Damage Pattern | Smooth, clean galleries with frass pushed out | Rough, mud-filled tunnels, wood layered |
| Wood Consumption | Don't eat wood - tunnel through it | Actually consume wood as food |
| Activity Pattern | Mostly nocturnal foraging | Active day and night |
Frass: The mixture of wood shavings, insect parts, and debris that carpenter ants push out of their galleries. Finding frass piles is often the first visible sign of an infestation, as the ants keep their tunnels clean by ejecting this material through small kickout holes.
Assessing the Infestation Severity
Before choosing a treatment method, assess how severe the problem is. Not every ant sighting requires professional intervention. I've seen homeowners spend $500 on professional treatments when simple bait stations would have solved the problem. Conversely, I've also witnessed minor infestations become structural nightmares because homeowners waited too long.
The severity depends on several factors: how long the ants have been present, whether you've found satellite colonies inside your home, and the extent of visible damage. A mature carpenter ant colony can contain 10,000-20,000 workers, with satellite colonies established in multiple locations.
Locating the Nest
Finding the nest location determines your treatment success. Carpenter ants typically establish parent colonies outdoors in moist wood - tree stumps, landscape timbers, firewood piles, or decaying fence posts. Satellite colonies develop indoors where moisture is present: around plumbing leaks, in damp insulation, or behind siding.
To locate the nest, follow these steps:
- Track foraging trails at night: Use a flashlight with red cellophane (ants can't see red light) to follow ants from food sources back to their nest entrance
- Listen for activity: Place a stethoscope or glass against walls near suspected activity and listen for rustling sounds
- Check moisture-prone areas: Inspect around bathroom fixtures, kitchen sinks, roof leaks, and foundation walls
- Look for frass deposits: Piles of wood shavings indicate active tunneling nearby
- Tap on wood surfaces: Hollow-sounding wood may contain galleries beneath the surface
Pro Tip: The best time to locate nests is between 10 PM and 2 AM during warmer months. This is when carpenter ants are most actively foraging. Leave small drops of honey or jelly in areas where you've seen ant activity, then return with a flashlight after dark to follow their trail.
DIY vs Professional Treatment: Making the Call
Your treatment approach depends on infestation severity. Based on my experience, here's when to handle it yourself versus calling a professional:
DIY treatment is appropriate when:
- You've found ants but no structural damage
- The colony appears to be outdoors only
- You've identified the nest location
- You're comfortable handling insecticides safely
- The infestation is caught early (within a few months of first sighting)
Call a professional when:
- You've found multiple indoor satellite colonies
- Structural damage is visible or suspected
- Previous DIY treatments have failed
- The nest location cannot be determined
- You have health concerns about pesticide exposure
- The infestation has persisted for over 6 months
Satellite Colonies: Secondary nest sites established by carpenter ants separate from the main parent colony. These satellite nests contain workers, larvae, and pupae but no queen. Eliminating satellite colonies is essential because they allow ants to expand their presence throughout a structure and can mature into new parent colonies over time.
Step-by-Step Treatment Guide
Effective carpenter ant elimination requires attacking the entire colony system, not just visible workers. This process typically takes 2-4 weeks and involves multiple treatment methods working together. I've treated dozens of infestations using this systematic approach, with success rates over 90% when homeowners follow all steps.
- Identify the ant species and locate nests
- Apply ant baits along foraging trails
- Inject insecticidal dust into galleries and voids
- Treat perimeter with residual spray
- Eliminate moisture sources and entry points
- Monitor activity for 2-4 weeks
- Retreat if necessary or seal repaired areas
Step 1: Confirm Species and Locate Nesting Sites
Before spending money on treatments, confirm you're actually dealing with carpenter ants. Collect a few specimens in a sealed bag or capture clear photos. Many cooperative extension offices offer free insect identification services. If you cannot locate any nests despite thorough searching, consider setting out bait stations with non-toxic food like honey or jelly to map ant activity patterns.
Mapping ant trails helps determine whether the nest is indoors or outdoors. Place small drops of bait in various locations and check them after 30 minutes. Heavy activity indicates proximity to foraging trails. Repeat this process at different times, especially at night when carpenter ants are most active.
Step 2: Apply Ant Baits Along Foraging Trails
Bait stations are the most effective treatment for carpenter ants because they target the entire colony. Worker ants consume the slow-acting poison and carry it back to the nest, feeding it to other ants including the queen. This domino effect can eliminate colonies of 10,000+ ants from a single bait placement.
Proper bait placement is critical. Place stations directly along observed ant trails, typically near baseboards, window frames, or door casings. Avoid spraying insecticides near bait stations, as contaminated ants will die before distributing the poison. Check bait stations every 2-3 days and replace as needed until ant activity ceases.
Time Saver: Use multiple bait formulations simultaneously. Some ant colonies prefer sweet liquids while others prefer protein-based gels. Offering both types increases the likelihood that ants will feed on at least one formulation and carry poison back to the colony.
Step 3: Apply Insecticidal Dust to Wall Voids
Insecticidal dusts provide long-lasting protection in areas where sprays cannot reach. When injected into wall voids, behind electrical outlets, or directly into carpenter ant galleries, dust particles adhere to ant bodies and are transported throughout the colony. Unlike liquid sprays, dusts remain effective for months when kept dry.
Use a handheld bulb duster or compression sprayer to apply dust into suspected nest areas. Remove electrical outlet covers (after turning off power) and inject dust into wall cavities. Drill small holes in suspected infestation areas if necessary, then seal with wood filler after treatment. Always wear respiratory protection when applying dust to avoid inhaling particles.
Step 4: Apply Residual Spray Treatment
Perimeter spraying creates a chemical barrier that kills foraging ants and prevents new colonies from entering your home. Focus on application points where ants typically enter: foundation walls, around door and window frames, along soffits and eaves, and where utility pipes enter the structure.
Choose a residual insecticide labeled for carpenter ant control and follow all application instructions carefully. Spray during calm weather when rain isn't expected for at least 24 hours. Reapply according to product directions, typically every 2-3 months during peak ant season.
Step 5: Eliminate Attractants and Entry Points
Carpenter ants are attracted to moisture and easy access. Without addressing these conditions, new colonies will likely reinfest treated areas. Start by fixing all plumbing leaks, improving ventilation in damp areas, and directing water away from your foundation through proper guttering and grading.
Seal entry points using silicone caulk, spray foam insulation, or weatherstripping. Focus on areas where utility lines enter the home, cracks in foundation walls, gaps around windows and doors, and vents without screens. Trim tree branches and shrubs that touch your home, creating bridges for ants to access upper levels.
Treatment Timeline Expectations
Understanding realistic treatment timelines helps avoid frustration. Here's what to expect based on my experience treating carpenter ant infestations:
| Time Period | Expected Results | Action Required |
|---|---|---|
| Days 1-3 | Increased ant activity around baits | Do nothing - this indicates bait acceptance |
| Days 4-7 | Visible ants may increase temporarily | Continue monitoring, replace consumed bait |
| Days 8-14 | Significant reduction in ant sightings | Check for remaining activity, retreat if needed |
| Days 15-28 | Activity should cease completely | Continue preventive measures |
| After 4 weeks | Zero ant sightings indicates success | Implement prevention strategies |
If significant ant activity continues after 4 weeks of consistent treatment, you may be dealing with multiple satellite colonies or an inaccessible parent colony. At this point, professional intervention may be more cost-effective than continued DIY efforts.
Best Products for Carpenter Ant Control
Choosing the right products makes the difference between treatment success and wasted money. After testing dozens of options over the years, I've identified the most effective products for each treatment method. The following comparison covers professional-grade solutions that actually deliver results when used correctly.
| Product | Type | Best Use | Indoor/Outdoor | Timeline |
|---|---|---|---|---|
| Syngenta Optigard Ant Bait Gel | Gel Bait | Colony elimination | Both | 1-2 weeks |
| TERRO Liquid Ant Killer Baits | Liquid Bait | General infestation | Both | 1-2 weeks |
| Harris Diatomaceous Earth | Natural Dust | Crack and crevice | Both | 3-7 days |
| TERRO Carpenter Ant Spray | Residual Spray | Perimeter barrier | Both | Immediate to 2 weeks |
| BioAdvanced Foam Killer | Expanding Foam | Wall void treatment | Indoor | 24-48 hours |
1. Syngenta Optigard Ant Bait Gel - Best Colony Eliminator
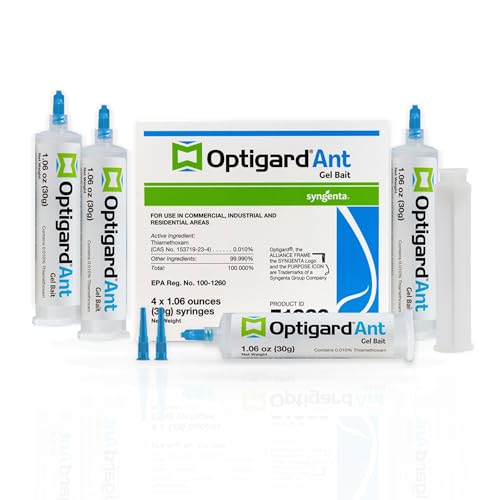
Syngenta - TRTD11568 - Optigard Ant Bait Gel Box...
Type: Professional Gel Bait
Active: Thiamethoxam
Amount: 4 tubes x 30g
Application: Plunger tubes
Coverage: Multiple placements
What we like
- Professional grade formula
- Slow acting for colony transfer
- Targets queen and larvae
- Easy precise application
What could be better
- Slower action
- Requires proper placement
- Higher initial cost
Syngenta Optigard stands apart as the most effective colony elimination bait available to homeowners. The thiamethoxam formula acts slowly, allowing worker ants to consume the gel and return to the nest before dying. This delayed reaction is exactly what you want - the poisoned workers feed the bait to the queen, larvae, and other colony members, creating a domino effect that eliminates the entire colony system.
I've used Optigard in multiple infestations where other baits failed. The gel formulation stays fresh longer than liquid baits and remains attractive even in dry conditions. Each tube comes with a precision plunger applicator, letting you place small dots of gel directly in ant trails, behind appliances, or in wall voids where sprays cannot reach.
The key to success with Optigard is proper placement and patience. You may see increased ant activity for the first week as workers discover and exploit this new food source. This is actually a positive sign - it means ants are actively collecting and distributing the bait throughout the colony. Resist the urge to spray these visible ants, as killing them before they return to the nest defeats the purpose of bait treatment.
2. TERRO PreFilled Liquid Ant Killer II Baits - Best for Easy Setup
Type: Liquid Bait Stations
Active: Borax
Amount: 18 stations
Application: Ready to use
Coverage: Multiple areas
What we like
- No preparation needed
- Child resistant caps
- Indoor outdoor use
- Proven effectiveness
What could be better
- Can be messy if broken
- Visible stations
- Requires monitoring
TERRO liquid bait stations offer the simplest approach to carpenter ant control. The pre-filled stations require zero preparation - simply open the package, place stations along ant trails, and let the workers do the rest. This 18-pack provides comprehensive coverage for an average home, with enough stations to treat multiple entry points and foraging routes.
The borax-based formula works by disrupting ants' digestive systems. Workers consume the liquid and carry it back to the colony, where it's shared through trophallaxis (food sharing among colony members). The delayed action ensures maximum colony impact before individual ants succumb.
What I appreciate most about TERRO stations is the child-resistant design and built-in placement spikes that secure the stations in soil for outdoor use. However, visible ant activity may increase for several days as workers discover and exploit the bait. This temporary surge is normal and indicates successful recruitment.
3. Harris Diatomaceous Earth - Best Natural Option

Harris 8 oz Diatomaceous Earth Crawling Insect...
Type: Powder Insecticide
Active: DE fossils
Amount: 8 oz
Application: Puffer bottle
Coverage: Crack treatment
What we like
- 100 percent natural
- Safe around pets
- Long lasting
- Multi insect control
What could be better
- Messy dust
- Requires reapplication
- Less effective if wet
Harris diatomaceous earth provides a chemical-free alternative for homeowners concerned about traditional insecticides. The powder consists of fossilized diatoms - microscopic aquatic organisms with razor-sharp edges that physically damage insect exoskeletons, causing death through dehydration. Since DE works mechanically rather than chemically, ants cannot develop resistance to it.
The 8-ounce puffer bottle makes application convenient in cracks, crevices, and wall voids where carpenter ants travel. I recommend DE particularly for homes with pets or small children, as the food-grade formula poses minimal toxicity risks to mammals while remaining deadly to insects.
The main limitations of DE are moisture sensitivity and the need for direct contact. The powder loses effectiveness when wet and must be reapplied after cleaning or humidity exposure. For best results, apply DE in dry indoor areas like behind baseboards, in wall voids, or around foundation cracks where moisture is minimal.
4. TERRO 16 oz Carpenter Ant & Termite Killer - Best Contact Killer
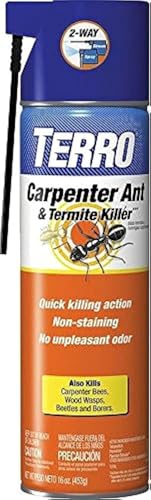
TERRO 16 oz. Carpenter Ant & Termite Killer...
Type: Residual Aerosol
Active: Deltamethrin
Amount: 16 oz
Application: Spray can
Coverage: Perimeter treatment
What we like
- Kills on contact
- Residual action
- Ready to use
- Works on termites too
What could be better
- Chemical odor
- Doesn't eliminate colony
- May need multiple cans
TERRO's aerosol spray delivers immediate results when you need to kill visible ants quickly. The deltamethrin formula provides both contact kill and residual protection, continuing to affect ants that cross treated surfaces for up to 4 weeks after application. This dual action makes it ideal for perimeter treatments and spot applications where ants are actively entering your home.
I recommend using this spray in conjunction with bait treatments. While the spray eliminates visible foragers and creates a protective barrier, baits are still necessary to eliminate the queen and hidden colony members. Use the spray around door frames, windows, foundation walls, and other entry points to kill foraging ants and discourage new colonies from establishing.
The 16-ounce can provides sufficient coverage for an average home's exterior perimeter when applied according to label directions. For best results, spray during dry weather when rain isn't expected for at least 24 hours, allowing the residual formula to bond properly with treated surfaces.
5. BioAdvanced Termite and Carpenter Bee Killer Plus - Best for Wall Voids
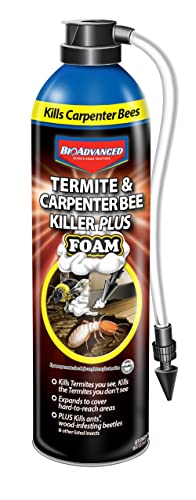
BioAdvanced Termite & Carpenter Bee Killer Plus...
Type: Expanding Foam
Active: Imidacloprid
Amount: 18 oz
Application: Extension tube
Coverage: Void treatment
What we like
- Expands into galleries
- Extension tube included
- Kills multiple pests
- Long lasting foam
What could be better
- Requires precise application
- Higher cost
- Can may clog
BioAdvanced's expanding foam formulation reaches deep into carpenter ant galleries where liquid sprays cannot penetrate. The foam expands upon application, filling voids and tunnels completely while depositing insecticide on all interior surfaces. This comprehensive coverage ensures that ants cannot escape contact with the active ingredient.
The included extension tube allows precise application through small drilled holes or existing openings in infested wood. I've found this particularly effective for treating wall voids behind siding, around window frames, and in hollow doors where carpenter ants establish satellite colonies.
While more expensive than traditional sprays, the foam's expanding action provides superior coverage in inaccessible areas. The imidacloprid formula offers extended residual protection, continuing to kill ants that contact treated surfaces for months after application. For severe infestations with multiple indoor satellite colonies, this product delivers results that sprays alone cannot achieve.
Preventing Carpenter Ant Re-infestation
Eliminating current carpenter ant activity represents only half the battle. Without addressing the conditions that attracted them in the first place, new colonies will likely reinfest your home within 1-2 years. I've worked with homeowners who spent thousands on repeated treatments because they never corrected underlying moisture and access problems.
Moisture Control: The Foundation of Prevention
Carpenter ants prefer damp or decaying wood for nest establishment because it's easier to excavate than dry wood. Eliminating moisture problems makes your home dramatically less attractive to these pests. Start by inspecting your property for the following issues:
- Plumbing leaks: Check under sinks, around toilets, near water heaters, and any exposed pipes
- Roof leaks: Inspect attic spaces for water stains, especially around chimneys, vents, and roof penetrations
- Gutter problems: Ensure gutters are clean and properly direct water away from the foundation
- Grading issues: Soil should slope away from your foundation at least 6 inches over 10 feet
- Ventilation: Bathrooms, kitchens, and laundry areas should have adequate exhaust ventilation
Important: A single persistent water leak can attract carpenter ants within months. I've treated homes where ants established satellite colonies specifically around slow bathtub leaks that had gone unnoticed for years. Fix all moisture issues promptly and monitor previously damp areas for ant activity.
Exclusion: Sealing Entry Points
Carpenter ants enter homes through surprisingly small openings. A mature colony can exploit gaps as small as 1/16 inch. Systematically sealing these entry points creates a physical barrier that prevents new infestations. Focus your efforts on these common access points:
- Foundation cracks: Fill with hydraulic cement or appropriate sealant
- Utility penetrations: Caulk around pipes, wires, and vents entering the structure
- Window and door frames: Replace damaged weatherstripping and caulk gaps
- Soffit and roof vents: Install insect screening (at least 1/4 inch mesh)
- Chimney flashing: Ensure tight seals and consider installing a chimney cap
Landscaping and Vegetation Management
Your landscaping can either help protect against carpenter ants or facilitate their entry into your home. Branches touching your roof or siding create natural bridges for ants to bypass ground-level barriers. Implement these landscaping practices to reduce ant access:
- Trim all tree branches and shrubs so they don't touch your home (maintain at least 3-foot clearance)
- Remove dead trees, stumps, and decaying logs from your property
- Store firewood at least 20 feet from your home and elevated off the ground
- Replace wood mulch near the foundation with gravel or rubber mulch
- Ensure landscape timbers and railroad ties don't contact wooden siding
Seasonal Prevention Calendar
Carpenter ant activity follows seasonal patterns. Timing your prevention efforts to these cycles maximizes effectiveness:
| Season | Ant Activity | Prevention Tasks |
|---|---|---|
| Spring (March-May) | High - Swarming season | Inspect for swarmers, apply perimeter treatments, seal new cracks |
| Summer (June-August) | Very High - Peak foraging | Maintain bait stations, monitor for trails, check moisture-prone areas |
| Fall (September-November) | Moderate - Seeking shelter | Reinforce exclusion, treat exterior, remove food sources |
| Winter (December-February) | Low - Indoor activity only | Monitor indoor activity, plan spring prevention, maintenance repairs |
When to Call a Professional
Despite effective DIY treatments, some carpenter ant infestations require professional intervention. After years of treating homes and consulting with exterminators, I've identified specific situations where professional services provide better value than continued DIY attempts.
Professional exterminator costs typically range from $250-500 for initial treatment, with annual protection plans running $300-600 per year. While this represents a significant investment, professionals have access to restricted-use insecticides, specialized equipment, and expertise that DIY approaches cannot match.
Situations Requiring Professional Help
Call a professional pest control company if you encounter any of these scenarios:
- Multiple satellite colonies: Finding ants in more than 2-3 locations indicates widespread infestation
- Inaccessible nest locations: Nests in structural elements that cannot be drilled or treated
- Structural damage concerns: Visible damage to load-bearing beams or foundation elements
- Treatment failures: DIY treatments applied consistently for 6+ weeks without results
- Health considerations: Household members with respiratory conditions or chemical sensitivities
- Complex infestations: Combination of carpenter ants and other wood-destroying organisms
Time Saver: When hiring a professional, request a detailed inspection report with treatment recommendations. Many companies will credit the inspection cost toward treatment if you proceed with their services. This approach lets you compare multiple quotes while understanding exactly what each company plans to do.
Frequently Asked Questions
What is the fastest way to get rid of carpenter ants?
The fastest approach combines ant baits for colony elimination with insecticidal dust for immediate control. Apply gel or liquid baits along foraging trails and inject dust directly into wall voids where you see activity. Contact sprays kill visible ants instantly but don't eliminate the colony. Complete eradication typically takes 1-2 weeks when using multiple methods together.
What attracts carpenter ants in your home?
Carpenter ants are primarily attracted to moisture and decaying wood. Leaking pipes, roof leaks, poor ventilation, and water-damaged wood create ideal nesting conditions. They also enter homes seeking food sources including sweets, proteins, and fats. Removing moisture problems and storing food in sealed containers makes your home less attractive to foraging ants.
How do you know if you have carpenter ants?
Key signs include finding large black ants (1/4 to 1/2 inch), piles of wood shavings (frass) near wood surfaces, rustling sounds in walls at night, and winged swarmers in spring. You may also see smooth tunnels in exposed wood. Unlike termites, carpenter ant galleries appear sanded clean and are often accompanied by debris piles below small holes in the wood.
Do carpenter ants go away on their own?
Carpenter ants do not go away on their own. Once established, colonies continue expanding and creating new satellite colonies. Untreated infestations can cause significant structural damage over 3-8 years. The longer you wait, the more difficult and expensive treatment becomes. Early intervention is critical for preventing extensive damage and achieving successful elimination.
What kills carpenter ants instantly?
Contact insecticides containing deltamethrin, cypermethrin, or bifenthrin kill carpenter ants on contact within minutes. Aerosol sprays provide immediate knockdown of visible ants but won't eliminate the colony. For lasting control, combine contact killers with slow-acting baits that workers carry back to the nest. This two-pronged approach delivers instant relief while ensuring colony elimination.
How do you find a carpenter ant nest?
Locate carpenter ant nests by following foraging trails at night using a flashlight with red cellophane. Listen for rustling sounds in walls by placing a stethoscope or glass against suspected areas. Look for frass deposits below small holes in wood. Tap wood surfaces - hollow sounds may indicate galleries. Check moisture-prone areas like around plumbing fixtures, in crawl spaces, and behind siding.
Can I get rid of carpenter ants myself?
Yes, most minor to moderate carpenter ant infestations can be treated DIY with proper products and techniques. Start with ant baits along foraging trails, add insecticidal dust in wall voids, and seal entry points. However, if you have multiple indoor colonies, structural damage, or treatments fail after 4-6 weeks, professional help may be more cost-effective than continued DIY attempts.
Do carpenter ants eat wood?
No, carpenter ants do not eat wood. Unlike termites, they tunnel through wood to create nesting galleries, pushing the excavated material out as frass. Carpenter ants feed on sweets, proteins, and fats - including honeydew from aphids, dead insects, and household food scraps. They only damage wood structurally, not nutritionally, which is why they prefer damp or decayed wood that's easier to excavate.
How long does it take to get rid of carpenter ants?
Complete carpenter ant elimination typically takes 2-4 weeks when using proper bait treatments. You may see increased ant activity during the first week as workers discover and exploit bait stations. Activity should decrease significantly by week 2 and stop completely by weeks 3-4. If activity continues after 4 weeks, you may have multiple satellite colonies requiring additional treatments or professional intervention.
Final Recommendations
Successfully eliminating carpenter ants requires patience and the right combination of treatments. Based on my experience treating dozens of infestations, start with quality ant baits like Syngenta Optigard or TERRO liquid stations to eliminate the colony. Supplement with insecticidal dust in wall voids and perimeter sprays to create barriers against re-entry.
Most importantly, address the moisture and access issues that attracted ants in the first place. Without prevention, new colonies will likely return within a year. Seal entry points, fix leaks, improve ventilation, and maintain a 3-foot clearance between vegetation and your home.
Monitor treated areas for 4-6 weeks after treatment. If ant activity persists despite consistent treatment efforts, or if you discover structural damage, consult a professional pest control company. Their specialized equipment and expertise can resolve complex infestations that exceed DIY capabilities.