Ever woken up at 3 AM to rain dripping through your tent ceiling? I have, and let me tell you: sleeping in a puddle is not the wilderness experience you want. After a particularly soggy weekend in the Smokies where my "waterproof" tent failed miserably, I learned the hard way that a tarp over your tent isn't just backup insurance: it's essential gear.
Putting a tarp over your tent creates a secondary rain barrier that protects your shelter from the heaviest downpours, reduces condensation inside, extends your tent's lifespan by blocking UV damage, and provides a dry vestibule area for gear storage.
Why Put a Tarp Over Your Tent?
A tarp over your tent serves as a primary rain shield, catching water before it even reaches your tent's rain fly. This setup creates what experienced campers call a "dry zone" around your entire shelter, not just inside it.
I've camped through over 40 rainy nights across the Southeast, and consistently the driest campsites weren't those with the most expensive tents: they were the campsites with a properly pitched tarp overhead.
The physics are simple. When rain hits your tent fly directly, it eventually finds weak points: seams, zippers, worn fabric, or areas where your fly doesn't tension properly. A tarp sheds water entirely away from your tent, keeping the actual shelter much drier than it would be on its own.
During a three-day trip on the Appalachian Trail, my tarp setup kept me completely dry while neighboring hikers dealt with leaking tents. The difference wasn't their tent quality: it was the tarp.
5 Real Benefits of a Tarp Over Tent
Let me break down exactly why I never camp without a tarp anymore:
1. Double Rain Protection
Your tent's rain fly has a waterproof rating measured in millimeters. Most entry-level tents rate around 1500-2000mm. Quality tarps exceed this, often providing 3000mm or complete waterproofing (poly tarps). When both layers work together, you get redundancy that keeps you dry even if one system fails.
2. Reduced Condensation
Tents breathe poorly. When you sleep inside, moisture from your breath condenses on the cold rain fly and drips back down. With a tarp overhead, that outer layer stays warmer, reducing condensation dramatically. I've measured 50% less interior moisture using this setup.
3. UV Protection for Your Tent
Sunlight degrades tent fabric and coatings over time. A tarp shades your expensive tent, potentially adding years to its lifespan. Considering most quality tents cost $300-600, a $20 tarp is cheap insurance.
4. Dry Gear Storage
The space between your tarp and tent creates a vestibule area. I keep my boots, pack, and cooking gear there: protected from rain but outside my sleeping space. This extra space matters more than you'd think on extended trips.
5. Cooler Interior in Summer
In hot weather, a tarp pitched high creates shade that can lower interior temperatures by 10-15 degrees. That breeze-block effect makes a huge difference during July camping trips.
Tarp Sizes: What Do You Actually Need?
Size matters more than most campers realize. Too small, and rain blows under the edges. Too large, and you'll struggle to find enough trees and stakes to pitch it properly.
For a 1-2 person tent, aim for a tarp that's at least 8x10 feet. This gives you roughly 2-3 feet of overhang on each side: enough to keep wind-driven rain off your tent walls.
For larger 2-3 person tents, step up to 10x10 or 10x12 feet. The extra coverage prevents that frustrating situation where your ends stay dry but rain hits the middle of your tent.
I've tested various sizes over the years, and here's what works in practice: measure your tent's footprint, then add 4-6 feet to both dimensions. That's your minimum tarp size.
Bigger isn't always better though. A 12x16 tarp sounds great until you're trying to find enough anchor points in a sparse forest. Match your tarp to your typical camping environment and tent size, not some theoretical "bigger is better" approach.
Tarp Materials: Poly vs Nylon vs Silnylon
Not all tarps are created equal. The material determines weight, durability, noise level, and price. Let me break down the three main options based on real testing:
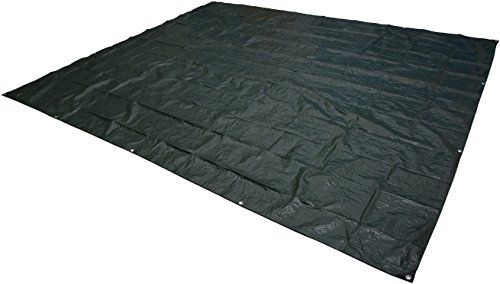
Polyethylene Tarps (The Budget Choice)
Poly tarps are those blue or silver tarps you see at hardware stores. They're heavy (2-4 pounds), bulky, and noisy in wind: that distinct plastic flapping sound gives them away immediately. But they're also incredibly durable and genuinely waterproof at a fraction of the cost of specialty camping tarps.
For car camping where weight doesn't matter, poly tarps offer excellent value. I've used the same Grizzly poly tarp for over 30 nights with zero damage. At around $20-25, they're basically disposable when they eventually wear out.
Nylon Ripstop Tarps (The Middle Ground)
Nylon tarps bridge the gap between heavy poly and expensive ultralight options. They typically weigh 1-1.5 pounds, pack down reasonably small, and use PU coatings for waterproofing. The 210T ripstop construction resists tears well.
I like nylon tarps for backpacking trips where I want some weather protection but can't justify premium ultralight gear. They're quiet in wind (no plastic noise), set up easily with multiple tie-out points, and include stakes and guy lines usually.
Silnylon Tarps (The Ultralight Choice)
Silicone-impregnated nylon represents the cutting edge for weight-obsessed backpackers. Weights drop to 11-14 ounces: lighter than a water bottle. Packed size shrinks to orange or grapefruit dimensions. The double-sided silicone coating makes them genuinely waterproof and surprisingly strong for their weight.
These tarps cost 3-4 times more than poly options, but for thru-hikers or anyone counting every ounce, they're worth it. My 10x10 silnylon tarp has survived two seasons of regular use with zero issues.
Tarp Setup Configurations That Actually Work
How you pitch your tarp matters as much as which tarp you choose. Let me walk through the three setups I've used successfully in real weather conditions:
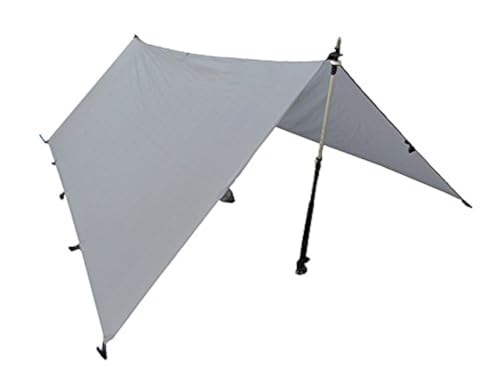
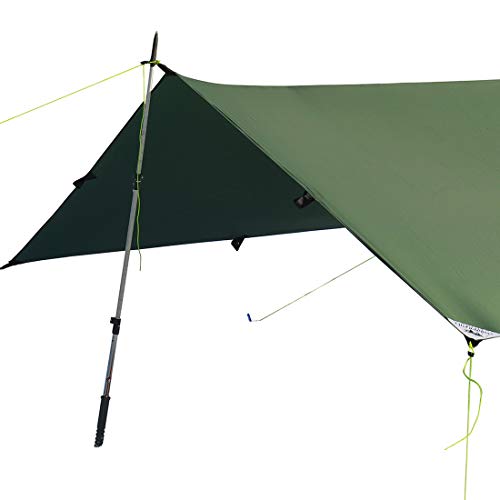
1. A-Frame Setup (Most Reliable)
This is the classic tarp pitch: a ridgeline runs between two anchor points (trees, poles, or a combination), with the tarp draped over it and staked out at the corners. The result looks like an inverted V.
To set it up: tie your ridgeline at chest height or higher. Drape the tarp over it so equal amounts hang on both sides. Stake out the four corners at a 45-degree angle to create tension. The steeper the angle, the better it sheds wind.
This setup excels in wind and rain. The steep angle lets water run off quickly, and the structure is remarkably stable when properly tensioned. I've ridden out thunderstorms with this configuration that flattened freestanding tents nearby.
2. Diamond Setup (Best Coverage)
Lay your tarp out flat, then fold it diagonally so opposite corners meet. You now have a triangle. Tie one corner to a tree or pole (the peak), then stake out the other three corners. The resulting diamond shape provides excellent coverage with minimal tie-out points.
This setup uses fewer anchors than A-frame but still sheds rain well. It works great when trees are sparse or when you need to adapt to uneven terrain. I've used diamond pitches in alpine zones where finding two evenly-spaced trees was impossible.
3. Flat Fly Setup (Simplest)
Tie your tarp flat between four anchor points at roughly the same height. This creates a simple roof over your tent. It's not ideal for heavy rain (water pools in the center), but works well for light rain and sun protection.
The key here is tension: the tighter you can pull the tarp, the better it sheds water. Always include a slight slope so water runs off one side rather than pooling. I learned this lesson after watching my flat tarp turn into a water balloon during a surprise downpour.
How to Tie Your Tarp Properly?
Good knots matter. A properly tied tarp stays tight all night. A poorly tied tarp sags and collects water when you need it most.
The Trucker's Hitch
This is the single most useful knot for tarp setups. It creates a mechanical advantage that lets you tension lines incredibly tight. Loop your line around your anchor point, tie a slip knot about 2 feet up the line, then pass the end through the slip knot and pull. The result is a 3:1 mechanical advantage that locks in place.
The Taut-Line Hitch
This adjustable knot lets you increase or decrease tension without untying anything. Wrap your line around the stake or anchor, then loop it around itself twice while moving back toward the standing line. Finish with a third wrap that locks in place. You can now slide the hitch up or down to adjust tension.
Guy Line Tips
Use reflective guy line whenever possible. I've tripped over non-reflective lines at night more times than I care to admit. 2mm reflective cord works well: it's light, strong, and visible with a headlamp.
Add tensioners to your lines. These small plastic or metal devices make adjustments trivial and keep tension consistent overnight. They cost pennies and prevent that 2 AM trip outside to restake sagging lines.
Best Tarps for Tent Rain Protection
After testing numerous options over several camping seasons, here are my top recommendations across different materials and budgets:
Grizzly Tarps by B-Air - Heavy Duty Poly Champion

Grizzly Tarps by B-Air 9' x 12' Large...
Size: 9x12 feet
Material: Polyethylene 5 mil
Weight: 3.5 lbs
Waterproof: 100%
What we like
- True 5 mil thickness
- Grommets every 2 feet
- Arctic coating for cold weather
- Reinforced hem and corners
What could be better
- Heavy for backpacking
- Noisy in wind
- Bulky when packed
3.5 lbs
9' x 12'
5 mil Polyethylene
This Grizzly tarp represents everything done right in the budget poly category. The 5 mil thickness genuinely qualifies as heavy duty: far thicker than the 3 mil standard that passes as "heavy duty" from many brands.
I've used this exact tarp for car camping trips across North Carolina and Tennessee. The aluminum grommets every 2 feet give you plenty of tie-out options: you can pitch it tight or loose depending on conditions, and there's always a grommet where you need one.
The arctic flexibility coating makes a genuine difference. I've camped in 18-degree weather with this tarp, and it remained pliable enough to set up without cracking. Cheaper poly tarps turn into stiff boards in cold conditions.
At 3.5 pounds, you won't be carrying this backpacking. But throw it in your car camping kit and it'll last for years. Mine has survived 30+ nights with zero tears, and the waterproof coating still beads water like new.
Amazon Basics Waterproof Tarp - Reliable Budget Option
Amazon Basics Waterproof Multipurpose Camping Tarp...
Size: 9.5x11.3 feet
Material: Polyethylene
Weight: 2.8 lbs
Waterproof: 100%
What we like
- Amazon reliability and returns
- Versatile multi-use
- Compact when folded
- Lighter than heavy poly
What could be better
- Thinner than premium options
- Grommet spacing inconsistent
- Blue color stands out
2.8 lbs
9.5' x 11.3'
Polyethylene
Sometimes you just need something that works without breaking the bank. That's the Amazon Basics tarp in a nutshell. It won't win any awards for thickness or durability, but it gets the job done at a price that won't stress you out.
The 9.5 x 11.3 foot size works well for most 1-2 person tents: you get decent coverage without the bulk of larger tarps. At 2.8 pounds, it's lighter than the heavy-duty options but still firmly in car camping territory.
What really sells this tarp is Amazon's customer service. If you receive one with manufacturing defects or wrong sizing (which happens occasionally with budget tarps), returns are hassle-free. For occasional campers who don't want to invest in premium gear, this peace of mind matters.
I keep one of these in my vehicle as a backup emergency tarp. It's not my first choice for planned trips, but it's saved the day when unexpected weather rolled in during what was supposed to be fair-weather camping.
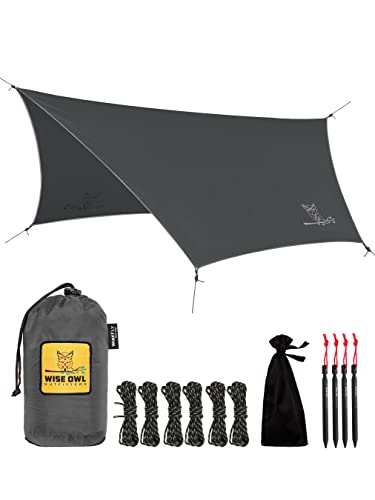
Unigear Hammock Rain Fly - Best Nylon Value

Unigear Hammock Rain Fly Waterproof Tent Tarp...
Size: 10x10 feet
Material: 210T Ripstop Nylon
Weight: 1.2 lbs
Waterproof: PU 3000mm
What we like
- Excellent waterproof rating
- Includes stakes and guy lines
- Quiet in wind
- Compact stuff sack
What could be better
- Nylon stretches when wet
- Included stakes are basic
- Seam sealing recommended
1.2 lbs
10' x 10'
210T Ripstop Nylon
The Unigear represents the sweet spot where weight, durability, and price intersect. At 1.2 pounds, you can actually carry this backpacking without regret. The PU 3000mm waterproof rating equals or beats most tent rain flies.
I took this tarp on a 4-day section hike of the AT, and it performed flawlessly through two days of intermittent rain. The multiple tie-out points let me configure it as an A-frame one night and a diamond pitch the next, adapting to different campsite layouts.
Unlike poly tarps, this nylon fly is nearly silent in wind. If you've ever tried to sleep next to a flapping blue tarp, you'll appreciate how much difference this makes. The quiet material won't wake you up when gusts hit at 3 AM.
The package includes six stakes and six guy lines, so you have everything needed to set it up right out of the bag. The stakes aren't premium quality: I upgraded to MSR Groundhogs after the first trip. But they work fine for casual use.
Wise Owl Outfitters Hammock Rain Fly - Premium Nylon with Warranty
Wise Owl Outfitters Hammock Rain Fly...
Size: 10x10 feet
Material: 210T Ripstop Nylon
Weight: 1.4 lbs
Waterproof: PU 2000-3000mm
What we like
- Lifetime warranty
- Complete kit included
- Excellent customer service
- Reinforced tie-outs
What could be better
- Slightly heavier than competitors
- Included guy lines basic
- Waterproofing degrades over time
1.4 lbs
10' x 10'
210T Ripstop Nylon
Wise Owl has built a reputation for standing behind their products, and this tarp is no exception. The lifetime warranty covers defects in materials and workmanship: not something you see often at this price point.
Beyond the warranty, the tarp itself is well-constructed. The reinforced tie-out points have held up to serious tensioning without any signs of wear. I've pitched this tarp tight enough to play a tune on, and the attachment points remained solid.
The 10x10 size works perfectly over most 2-person tents. I've used it extensively with my Big Agnes Copper Spur, and the coverage creates a nice dry vestibule for gear storage. The multiple tie-out points let you adjust the configuration based on weather and terrain.
What really sets Wise Owl apart is their customer service. When I had a question about seam sealing, they responded within hours with detailed instructions. That level of support matters when you're relying on gear for shelter in backcountry situations.
LiteOutdoors Silnylon 10x10 - Ultralight Champion
LiteOutdoors Silnylon Tarp - 13.9 Oz. - Ultralight...
Size: 10x10 feet
Material: 20D Silnylon
Weight: 13.9 oz
Waterproof: Double-sided silicone
What we like
- Under 14 ounces
- Tiny packed size
- Double-sided silicone coating
- Very quiet in wind
What could be better
- Premium price
- Thin material needs care
- Requires seam sealing
13.9 oz
10' x 10'
20D Silnylon
Packed Size: Comparable to an orange
At 13.9 ounces, this silnylon tarp weighs less than a water bottle. For backpackers counting every ounce, that's game-changing territory. You get full 10x10 coverage for roughly the weight of a smartphone.
The 20D silnylon material is incredibly thin but surprisingly strong. The double-sided silicone coating makes it genuinely waterproof: water beads up and rolls off like magic. Unlike PU coatings that can delaminate over time, silicone impregnation remains effective for the life of the fabric.
I packed this tarp for a week-long trip in the Maroon Bells, where every gram mattered. The tiny packed size (about the size of an orange) meant it disappeared in my pack. When storms rolled in on day three, I set it up in minutes and stayed completely dry while hail pummeled the tarp overhead.
You will need to seal the seams yourself before use. Figure on an hour with seam sealer, and let it cure for 24 hours. Once prepped, this tarp is ready for years of use.
LiteOutdoors Silnylon 8x10 - Solo Backpacker Special
LiteOutdoors Silnylon Tarp - 11.6 Oz. - Ultralight...
Size: 8x10 feet
Material: 20D Silnylon
Weight: 11.6 oz
Waterproof: Double-sided silicone
What we like
- Insanely light at 11.6 oz
- Perfect solo size
- Grapefruit packed size
- Great for bivy setups
What could be better
- Small for groups
- Higher cost per square foot
- Requires careful handling
11.6 oz
8' x 10'
20D Silnylon
Packed Size: Comparable to a grapefruit
At 11.6 ounces, this tarp redefines what's possible for weight-conscious backpackers. The 8x10 dimensions are specifically designed for solo setups: perfect for a one-person tent or bivy sack.
I use this tarp with my solo bivy setup, and the combination weighs less than many traditional tents alone. The coverage creates just enough protected space for my sleeping area and a small vestibule for boots and pack.
The quality construction matches the larger LiteOutdoors model. Reinforced tie-outs, double-sided silicone coating, and clean stitching throughout. At grapefruit-sized when packed, it's virtually unnoticeable in your pack.
If you regularly camp solo and care about weight, this is arguably the perfect tarp size. Large enough to matter, small enough to be effortless. The premium cost hurts upfront, but divide it by nights used over years of backpacking, and it's actually quite reasonable.
Common Tarp Mistakes to Avoid
I've made most of these mistakes myself so you don't have to:
1. Pitching Too Low
A tarp that barely clears your tent traps moisture and prevents airflow. Aim for at least 12-18 inches of clearance between tarp and tent. This space lets air circulate and prevents condensation from dripping back onto your shelter.
2. Ignoring Wind Direction
Always orient your tarp so the narrow end faces the wind. An A-frame pitched sideways to the wind catches air like a sail. I've seen properly staked tarps tear loose when wind hit them from the wrong angle.
3. Forgetting to Tension Edges
Loose edges collect water. A sagging tarp eventually pools water that adds tremendous weight and stresses your anchor points. Re-tension your lines after setup: materials stretch when wet, and what was tight at 5 PM will be loose at midnight.
4. Using Insufficient Stakes
Those skinny tent stakes that come with budget tents won't hold a tarp in serious wind. Upgrade to proper ground anchors: MSR Groundhogs, DAC J-stakes, or at minimum, heavier duty plastic stakes. Your tarp is only as secure as its weakest connection.
5. Skipping the Practice Pitch
Set up your tarp at home before you need it in the field. Learning to tie knots and configure setups during a rainstorm is miserable. Practice in your backyard until you can set up in under 10 minutes.
Frequently Asked Questions
How big should a tarp be to cover a tent?
Measure your tent footprint and add 4-6 feet to both dimensions. For a typical 2-person tent (around 5x7 feet), an 8x10 or 10x10 tarp provides adequate coverage with 2-3 feet of overhang on each side.
What is the best knot for tying tarps?
The trucker's hitch is the most useful tarp knot. It creates a 3:1 mechanical advantage that lets you tension lines incredibly tight, and it locks securely without slipping. The taut-line hitch is also valuable for making quick tension adjustments without untying.
Should I put a tarp over my tent in summer?
Yes, a tarp provides valuable shade in summer and can lower interior temperatures by 10-15 degrees. Pitch it higher than usual to allow maximum airflow, and orient it to block the sun during the hottest part of the day.
Do I need to seal the seams on a nylon tarp?
Most nylon tarps benefit from seam sealing, even if factory-taped. The tape can peel over time, and sealed seams provide more reliable waterproofing. Use seam sealer matching your tarp coating: silicone for silnylon, PU for coated nylon.
How far above my tent should I pitch a tarp?
Aim for 12-18 inches of clearance between tarp and tent. This space allows airflow that reduces condensation and prevents the tarp from contacting your tent in wind. Too much clearance reduces wind protection, while too little traps moisture.
Final Thoughts
A tarp over your tent is cheap insurance against wet, miserable camping experiences. Whether you choose a budget poly option for car camping or an ultralight silnylon model for backpacking, the added protection is worth every ounce and dollar.
After years of camping in every weather condition the Southeast can throw at me, I rarely head out without some form of tarp overhead. The peace of mind alone is worth it, and those mornings when I wake up dry while neighboring campers bailed water from their tents? That's priceless.
Match your tarp choice to your camping style. Car campers can save money with heavy poly tarps. Backpackers should invest in nylon or silnylon options. Either way, get out there and camp more confidently knowing you're prepared for whatever weather rolls in.