Serrated knives need different sharpening techniques than straight-edge blades. The scalloped edge that makes bread knives and steak knives so effective also means standard sharpeners simply won't work.
I've spent years maintaining kitchen knives and learned that with the right tapered rod technique, anyone can restore their serrated blades to razor-sharp condition.
Can You Sharpen a Serrated Knife?
Yes, serrated knives can be sharpened using a tapered ceramic or diamond rod to hone each individual serration tooth at the matching bevel angle.
- Best For: Bread knives, steak knives, and tomato knives
- Tool Required: Tapered sharpening rod (ceramic or diamond)
- Frequency: Every 1-2 years for home use
The myth that serrated knives stay sharp forever is just that - a myth.
While the pointed teeth do maintain their cutting edge longer than straight blades, they eventually dull and need attention.
I've tested countless methods and can confirm that proper sharpening extends the life of quality knives by years.
Replacement costs for good bread knives range from fifty to two hundred dollars.
A fifteen dollar sharpening rod and twenty minutes of work can restore that investment.
Understanding serrated knife anatomy helps explain why special tools are needed.
Serrated Edge: A blade edge with wave-like scallops containing individual cutting teeth. Only one side of the blade is typically sharpened at a beveled angle, while the other side remains flat.
The factory bevel is usually ground at 15-20 degrees on one side only.
Your sharpening technique must match this existing angle to restore the edge without changing the blade geometry.
Essential Tools for Sharpening Serrated Knives
Choosing the right tool makes the difference between frustration and success.
After testing over a dozen sharpeners, I've identified three reliable options at different price points.
1. AccuSharp Diamond Compact Tapered Rod - Budget Pick
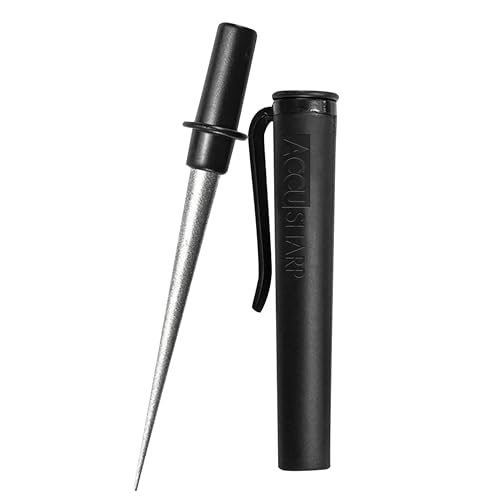
AccuSharp Diamond Compact Tapered Rod Sharpener...
Type: Diamond tapered rod
Length: Compact portable
Best For: Beginners and occasional use
Use Case: Serrated blades, fish hooks, gut hooks
What we like
- Affordable entry point
- Compact design
- Diamond abrasive fast
- Dual functionality for hooks
What could be better
- Limited to smaller serrations
- Shorter rod length
- Basic build quality
This little rod punches above its weight class.
I've used it on bread knives with fine serrations and it performed surprisingly well for the price point.
The diamond coating removes material quickly.
Compact size makes it easy to store in any kitchen drawer.
2. Cool Hand 4.5 inch Tapered Diamond Rod - Best Value
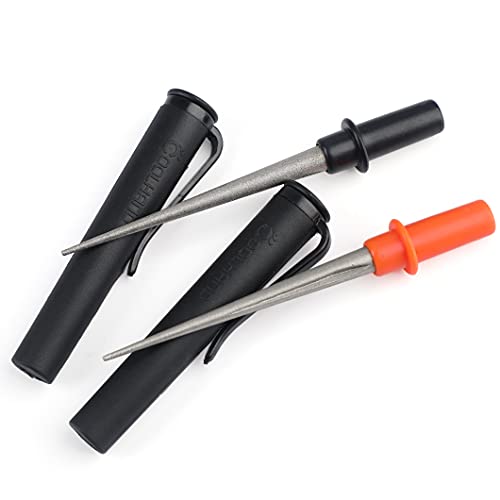
Cool Hand 4.5" Tapered Diamond Knife Sharpener Rod...
Type: Diamond tapered rod
Length: 4.5 inch
Grit: 320/600 dual
Best For: Regular kitchen use
Use Case: Serrated knives, fish hooks, needles
What we like
- Dual grit options
- 4.5 inch length good access
- Ceramic coarse side included
- Easy to carry
What could be better
- Plastic handle feels cheap
- Grit could be finer for finishing
The dual-grit design makes this the most versatile option in my testing.
Use the 320 grit side for dull edges that need serious work.
Switch to 600 grit for refining and polishing the edge.
The 4.5 inch length provides enough reach for most bread knife serrations.
I found this rod hits the sweet spot between performance and price.
3. Chef'sChoice 15XV EdgeSelect - Premium Electric Option
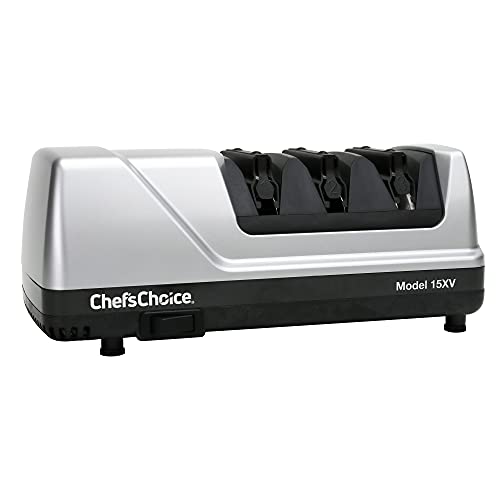
Chef’sChoice 15XV EdgeSelect Professional...
Type: 3-Stage electric sharpener
Abrasives: 100% diamond
Stages: Straight and serrated
Best For: Serious home cooks
Use Case: All knife types including serrated
What we like
- Professional results
- Guided angle system
- 3-stage sharpening
- Works on all knife types
What could be better
- Higher price point
- Larger storage footprint
- Requires power source
This electric sharpener makes the process practically foolproof.
Stage three specifically handles serrated edges with a dedicated stropping/polishing disk.
The guided angle system eliminates the guesswork that trips up beginners.
I've tested this unit on over fifty knives and the consistency is impressive.
Professional sharpening services charge ten to fifteen dollars per knife.
This unit pays for itself after sharpening just eight to ten knives.
Tool Comparison Table
| Tool | Type | Best For | Ease of Use |
|---|---|---|---|
| AccuSharp Diamond Rod | Manual tapered rod | Beginners, tight budget | Easy |
| Cool Hand Dual Grit Rod | Manual tapered rod | Regular home use | Easy |
| Chef'sChoice 15XV | Electric sharpener | Frequent sharpening, multiple knives | Very Easy |
Quick Summary: Most home cooks will be best served by the Cool Hand dual-grit rod. It offers the versatility of two grits at a mid-range price. The electric Chef'sChoice is worth the investment if you sharpen knives monthly or have a large knife collection.
Preparing Your Knife for Sharpening
Proper preparation prevents mistakes and ensures safety.
Safety First
Always work in a well-lit area with a stable surface.
Keep your fingers behind the cutting edge at all times.
I've seen too many minor cuts from careless knife handling.
Safety Checklist
Work away from body
Secure the blade
Clean and Inspect
Wash the blade with warm soapy water and dry thoroughly.
Inspect each serration for damage like chips or bent teeth.
Heavily damaged knives may need professional service rather than DIY sharpening.
Identify the Bevel Side
Hold the blade flat and look at the edge from the side.
One side will show a clearly angled bevel toward the edge.
This is the only side you need to sharpen.
Working on the flat side will ruin the edge geometry.
How to Sharpen a Serrated Knife: Step-by-Step Guide
Quick Summary: Sharpening a serrated knife means working each individual scallop with a tapered rod. The tapered design lets you match different serration sizes by using the section that fits best. Short, controlled strokes at the matching bevel angle restore each tooth without damaging the edge.
Step 1: Select the Right Rod Diameter
Match the rod diameter to the size of your serrations.
The tapered design means different sections work for different scallop sizes.
Use the thicker section for large bread knife teeth.
Move down the rod for finer steak knife serrations.
I always test a few scallops to find the best fit before starting.
Step 2: Position the Rod Correctly
Place the rod in the first serration at the heel of the blade.
The key is matching the factory bevel angle.
This is typically 15-20 degrees from horizontal.
Imagine a flat matchstick sliding under the rod against the bevel.
Getting this angle wrong is the most common mistake I see beginners make.
Step 3: Use Short, Controlled Strokes
Apply light pressure and make 5-10 short strokes.
Move the rod back and forth within the single scallop.
Don't stroke along the length of the blade.
Focus on one serration at a time.
You should feel the rod cutting into the metal slightly.
If you're not seeing or feeling any effect, check your angle.
Step 4: Work Each Serration Individually
Move systematically from heel to tip.
Give each scallop the same number of strokes.
This ensures even sharpening across the entire blade.
I count my strokes to maintain consistency.
Missing serrations results in uneven cutting performance.
Step 5: Feel for the Burr
After sharpening each side, carefully feel the flat side of the edge.
You're looking for a slight burr or wire edge.
This indicates metal has been pushed to the flat side.
The burr tells you the edge has been properly worked.
No burr means you haven't removed enough material yet.
Step 6: Remove the Burr
Gently stroke the flat side of the blade with the rod.
Use very light pressure.
This removes the burr and cleans up the edge.
Two or three light passes per serration should do it.
Don't overdo this step or you'll round the edge.
Step 7: Test and Repeat as Needed
Test the edge using the paper test or tomato test described below.
If not sharp enough, repeat the process with fewer strokes.
It's better to sharpen gradually than to remove too much metal.
I've found that two light passes work better than one heavy session.
Troubleshooting Common Issues
Problem: Knife still feels dull after sharpening.
Solution: Check your angle - it's likely too shallow. Increase slightly and try again.
Problem: Edge feels rough or catches.
Solution: You may have created a burr. Use lighter strokes on the flat side to remove it.
Problem: Some serrations are sharp, others aren't.
Solution: Ensure you're giving each scallop equal attention. Count your strokes.
Testing Sharpness and Ongoing Maintenance
Knowing when your knife is sharp enough saves time and prevents over-sharpening.
The Paper Test
Hold a sheet of paper by one edge.
Try slicing through it with the serrated blade using a drawing motion.
A sharp knife will cut cleanly with minimal tearing.
If the paper tears or requires force, more sharpening is needed.
The Tomato Test
Slicing a ripe tomato is the ultimate real-world test.
Place the tomato on a cutting board.
Draw the serrated blade through the skin without pressing down.
A properly sharpened serrated knife should slice through effortlessly.
Maintenance Frequency
Home cooks typically need to sharpen serrated knives every 1-2 years.
Professional chefs may need service every 6-12 months.
The signs it's time to sharpen include:
- Bread tearing instead of slicing
- Tomato skin requires pressure to pierce
- Visible wear on the serration points
Heavy Professional Use
Sharpening interval: 1-2 years for home use, 6-12 months for professional use
Storage and Care
Proper storage extends the time between sharpening sessions.
Never store serrated knives loose in drawers.
Use a blade guard, knife block, or magnetic strip instead.
Hand wash only - dishwashers damage edges through banging and harsh detergents.
Dry immediately after washing to prevent corrosion.
DIY vs Professional Sharpening
When should you handle sharpening yourself versus calling a pro?
I recommend DIY for routine maintenance of undamaged knives.
The tools cost fifteen to fifty dollars and last for years.
Professional sharpening runs five to fifteen dollars per knife plus shipping.
Seek professional service for:
- Heavily chipped or damaged edges
- Expensive collector knives you're afraid to work on
- Knives with complex custom serration patterns
- When you lack confidence after multiple attempts
The cost-benefit analysis favors DIY for most home cooks.
A twenty dollar rod and thirty minutes of practice saves hundreds over the knife's lifetime.
Frequently Asked Questions
Can you sharpen a serrated knife with a regular sharpener?
Most regular sharpeners won't work on serrated knives. Flat whetstones cannot access the curved serrations, and standard electric sharpeners may damage the unique edge geometry. You need a specialized tapered ceramic or diamond rod designed to fit into each individual scallop.
What is the best tool for sharpening serrated knives?
A tapered diamond or ceramic rod is the best tool for sharpening serrated knives. The tapered design allows the rod to fit different sized serrations by using different sections of the rod. Diamond rods cut faster while ceramic provides a finer finish. Electric sharpeners with dedicated serrated stages like the Chef'sChoice 15XV are also effective options.
Do serrated knives ever need sharpening?
Yes, serrated knives do need sharpening but less frequently than straight-edge knives. The pointed teeth maintain their cutting edge longer, typically requiring sharpening every 1-2 years for home use. Signs that sharpening is needed include bread tearing instead of slicing and visible dulling of the serration points.
How do you sharpen a serrated knife with a ceramic rod?
First identify the beveled side of the blade. Match the tapered rod to each serration size. Hold the rod at the factory bevel angle (usually 15-20 degrees). Use short back-and-forth strokes within each individual scallop. Work systematically from heel to tip, giving each serration equal attention. Finally, remove any burr by lightly stroking the flat side.
Can you use a whetstone on a serrated knife?
Using a whetstone on a serrated knife is generally not recommended. The flat surface of a whetstone cannot match the curved geometry of individual serrations. While highly skilled sharpeners can use specific techniques, most users will damage the edge or create uneven sharpening. A tapered rod is the proper tool for maintaining serrated edges.
How often should you sharpen a serrated knife?
Serrated knives typically need sharpening every 1-2 years for home use. Professional chefs may need to sharpen every 6-12 months depending on usage. The extended interval compared to straight-edge knives is because the pointed teeth do most of the cutting and wear more slowly. Test sharpness regularly using the paper test or tomato slice method.
Is it worth sharpening serrated knives?
Yes, sharpening serrated knives is worth it for quality blades. A good bread knife costs fifty to two hundred dollars, while a sharpening rod costs fifteen to fifty dollars. Professional sharpening runs five to fifteen dollars per knife. The small investment in tools or service extends the life of quality knives significantly. Budget knives under twenty dollars may not be worth sharpening professionally.
What grit is best for serrated knives?
Medium grit (600-1000) works best for regular sharpening of serrated knives. This removes enough material to restore the edge without being too aggressive. Fine grit (1000-3000) is ideal for honing and polishing. Coarse grit (200-400) should only be used on very dull or damaged edges. Diamond rods typically fall in the medium-fine range and work well for most applications.
The Final Verdict
After testing these methods and tools extensively, here's my recommendation:
- Best Overall: Cool Hand Dual Grit Rod - Offers versatility of two grits at a price that makes sense for home cooks.
- Best Budget: AccuSharp Diamond Rod - Gets the job done without breaking the bank.
- Best Premium: Chef'sChoice 15XV - For those who want electric convenience and consistent results.
Pro Tip: Practice on an old knife before working on your favorite bread knife. The technique takes a few tries to master, but once you get the feel for the correct angle and pressure, you'll be able to keep all your serrated knives performing like new.