I'll never forget my first beach camping disaster. After driving three hours to the coast, I set up my tent about 20 feet from the water. Regular tent stakes, sandy soil, beautiful sunset. Around 2am, I woke up to waves crashing way too close. Had to pack up everything in the dark and move. The next morning, I saw where the high tide had reached—exactly where my tent had been.
Camping on sand requires different techniques than traditional campground camping. The ground shifts, stakes pull out, tides move faster than expected, and wind hits harder without natural barriers. But once you understand the unique challenges, beach camping rewards you with sunrises most people never see and the sound of waves as your lullaby.
After 15+ beach camping trips up and down the California coast, I've learned what actually works. Here's how to camp on sand without learning things the hard way like I did.
What Makes Camping on Sand Different?
Camping on sand is fundamentally different from traditional camping because the ground cannot hold standard tent stakes, tides can flood your campsite overnight, and salt air corrodes gear rapidly. Sand shifts underfoot, creating uneven sleeping surfaces. Wind accelerates across open beaches with no trees to break it. These unique challenges require specialized gear and techniques that regular camping guides never mention.
I've seen seasoned campers struggle on beaches because they relied on campground habits. That approach fails when your stakes pull out at 3am and your tent collapses. The difference isn't just annoying—it can be dangerous if you don't understand tide behavior or wind patterns.
Yes, you can successfully camp on sand with the right preparation. Key requirements include sand-specific stakes or anchors, tide-aware site selection well above the high tide line, wind protection setup, and sand management techniques to keep your camp clean.
- Best For: Beach campers, coastal explorers, desert campers
- Challenge: Requires specialized anchoring and safety awareness
Essential Gear for Sand Camping
Beach camping demands equipment that most campers never need. Standard gear works fine until it doesn't. I've watched people try to improvise with inadequate equipment, and it usually ends with a miserable night or worse—gear failure in wind.
The right equipment makes the difference between a magical experience and a disaster. After testing various setups over multiple seasons, here's what I consider non-negotiable for sand camping success.
Sand Stakes or Anchors: Regular tent stakes are useless in sand. You need 12-18 inch stakes specifically designed for sandy soil, or spiral anchors that grip deep. I've used 9-inch standard stakes that pulled out in 15mph winds. Upgrade before you go.
Tent Footprint or Ground Sheet: Sand is abrasive. It will wear through your tent floor faster than you think. A footprint adds a critical barrier layer. I learned this after noticing micro-abrasions on my floor after just one beach trip.
Extra Guy Lines: Beach camps need more anchoring points than regular sites. Wind comes from all directions with no natural breaks. Pack 50-100 feet of extra cordage. I carry 75 feet minimum and have used it all.
Wind Break or Tarp: Natural wind protection rarely exists on beaches. A configurable tarp system creates crucial shelter. This can be the difference between enjoying your camp and spending the day huddled in your tent.
Whisk Broom and Dust Pan: Sand management is constant. A small whisk broom keeps your living area tolerable. Without one, you'll be sleeping in a sandbox by nightfall. This $10 item transformed my beach camping comfort.
Choosing the Perfect Beach Campsite
Site selection is the most critical safety decision you'll make while beach camping. The perfect spot at 5pm can be underwater at 2am. I've made this mistake personally, and nothing ruins a trip faster than an emergency midnight camp relocation.
How far above the high tide line should you set up camp?
Set up camp at least 50-100 feet above the high tide line, and add extra buffer during spring tides or new moon phases. Look for the debris line (seaweed, driftwood) marking previous high water levels and camp well above it.
- Safety Buffer: 50 feet minimum, 100+ during spring tides
- Visual Indicator: High tide debris line
Tide tables are your most important planning tool. Check them for your entire stay, not just arrival day. High tide levels vary significantly day to day. I've seen 8-foot differences between regular and spring tides at the same beach.
Look for the debris line—that line of seaweed, shells, and driftwood marking where the last high tide reached. Camp well above it. During spring tides (new and full moons), tides run higher than normal. Add extra buffer.
Wind direction matters too. Position your tent door perpendicular to prevailing winds for better ventilation and less sand entry. Face the back of your tent toward the wind whenever possible. This simple adjustment keeps surprising amounts of sand outside where it belongs.
Check beach regulations before you go. Many beaches prohibit camping entirely. Others require permits or designate specific camping zones. Nothing worse than arriving and discovering camping isn't allowed. I research this at least a week in advance now.
How to Set Up Your Tent on Sand?
Tent setup on sand requires completely different staking techniques. I've tried the regular campground approach. It doesn't work. Your tent will collapse or blow away, probably at 3am during the windiest part of the night.
How do you anchor a tent on sand?
Quick Summary: Sand anchoring requires longer stakes (12-18 inches), burying stakes horizontally, or using deadman anchors with rocks or sandbags. Standard 6-8 inch stakes will pull out in even moderate wind.
Step 1: Level Your Site
Sand is naturally uneven. Before pitching your tent, create a level platform. Use your feet or a small shovel to flatten the area. Remove large debris, shells, or rocks that could puncture your floor or make sleeping uncomfortable. I spend 10 minutes on this step and sleep much better for it.
Step 2: Lay Down Your Footprint
Place your tent footprint or ground sheet first. This protects your floor from abrasion and creates a cleaner surface for setup. Tuck the edges under slightly so sand doesn't blow underneath. I fold the edges under about 2 inches all around.
Step 3: Position Your Tent
Place your tent on the footprint with the back facing the prevailing wind. This orientation minimizes sand entry through the door and improves stability. Consider sun position too—you'll want shade in late afternoon if possible.
Step 4: Stake with Sand Anchors
This is where most people fail. Regular stakes pull right out of sand. You need specialized techniques:
Spiral Sand Stakes: Screw these into the sand at an angle, pointing away from the tent. The spiral design grips sand far better than straight stakes. I use 12-inch spiral stakes and they've held in 25mph winds.
Deadman Anchor Method: If stakes pull out, bury a small bag, rock, or stake horizontally in a trench. Attach your guy line to this buried anchor. The horizontal resistance distributes force over a larger area. This ancient technique still works better than most modern solutions in loose sand.
Bury Guy Lines: In extremely loose sand, bury the guy line itself in a U-shaped trench with a stake or rock at the bottom. The sand holds the line through friction. This saved my tent during a 30mph gust event.
Step 5: Stake All Anchor Points
Use every stake loop your tent has. Beach camping isn't the time to skip anchor points for faster setup. I stake the vestibules even when not fully deployed—the extra stability matters in wind. Each properly placed stake contributes to overall tent integrity.
Step 6: Tension Guy Lines Properly
Guy lines should be tight but not straining. Too loose and your tent flaps; too tight and you stress seams. Check tension after setup again in 15 minutes—sand settles and stakes can shift. I retension everything before going to sleep.
Pro tip: If you're camping near dunes, consider pitching behind one for natural wind protection. Dunes provide excellent windbreaks but never alter them or stake into protected vegetation. Beach grass stabilizes dunes and damaging it is often illegal.
Wind Protection Strategies
Beach wind hits harder than inland wind because there's nothing to slow it down. I've experienced comfortable 10mph breezes turn into 25mph gusts after sunset. Wind protection isn't optional—it's essential for comfort and safety.
How do you protect your tent from wind at the beach?
Natural Barriers: Camp behind dunes, rocks, or vegetation when possible. Even low scrub can reduce wind speed significantly. Position your tent so these features are upwind. I've found that a 3-foot dune reduces wind impact by about 50%.
Tarp Windbreak: Set up a tarp upwind of your camp. This creates a wind shadow that makes cooking, relaxing, and even sleeping much more pleasant. Angle the tarp so wind flows over, not under. I use a simple A-frame configuration with the open side away from prevailing winds.
Tent Orientation: Point the narrowest end of your tent into the wind. This reduces wind resistance and improves stability. Most tents are aerodynamically designed to face wind this way. I reoriented my tent halfway through one trip and the difference was dramatic.
Reduce Windage: Keep your tent's rainfly taut. Flapping fabric creates noise, stress, and can fail. Double-check all guy lines before bed. Wind often increases at night on beaches due to temperature differences between land and water.
Keeping Sand Out of Your Tent
Sand management is the endless challenge of beach camping. I've been on trips where we were still finding sand weeks later in our gear at home. But proper techniques dramatically reduce this problem.
How do you keep sand out of your tent?
Designated Entry Procedure: Establish a routine for entering your tent. Shake off thoroughly at the door. Remove sandy footwear before entering. Consider having camp shoes that stay outside your living area. This simple habit prevents 80% of sand intrusion.
Vestibule Management: Use your vestibule as a transition zone. Leave sandy gear here rather than bringing it into the main sleeping area. If your tent has multiple vestibules, designate one as "clean" and one as "dirty" storage.
Whisk Broom by the Door: Keep a small broom just outside your tent. Quick sweeps before entering make a huge difference. I sweep my site morning and evening, plus whenever I notice accumulation. This 30-second habit pays dividends all day.
Footprint Placement: Your footprint should extend slightly beyond your tent floor. This creates a clean approach zone and prevents sand from migrating between layers. Tuck edges under so sand doesn't blow underneath.
Zipper Care: Sand zippers slowly to avoid jamming. Keep zippers clean with a quick brush or shake. Lubricate with silicone spray if they become gritty. Salt air makes zippers stick even without sand—combination is a tent zipper killer.
Beach Camping Safety Essentials
Beach environments have unique hazards that campers don't encounter elsewhere. Understanding these risks makes the difference between a memorable trip and a dangerous situation. I've learned some of these lessons through close calls.
CRITICAL TIDE SAFETY WARNING
Tides can rise faster than expected and reach higher than predicted. Spring tides during new and full moons run significantly higher than normal. Storm surge can push water even further beyond predicted levels. NEVER camp below the high tide debris line. Add substantial buffer—50 feet minimum, more during spring tides. Check tide tables for your entire stay, not just arrival day. Campers have died after being trapped by rising tides.
Weather Monitoring: Coastal weather changes rapidly. Check forecasts before you go and monitor conditions during your trip. Wind often increases at night. Fog can roll in quickly, reducing visibility to near zero. I carry a weather radio and check it twice daily.
Salt Air Protection: Salt corrodes metal rapidly. Zippers, poles, and electronics are especially vulnerable. Rinse gear with fresh water after trips. Lubricate zippers with silicone. Cover electronics when not in use. I've had zippers seize completely after just one beach trip without proper care.
Sun Protection: Beach environments amplify sun exposure. Sand reflects UV radiation, increasing burn risk. You're exposed from above and below. Wide-brim hat, sunscreen, and proper clothing are non-negotiable. I've seen severe sunburn ruin trips on overcast days because people underestimated reflected UV.
Wildlife Awareness: Beaches have their own wildlife considerations. Seals, sea lions, and birds may be present. Keep distance from marine mammals—approaching them is illegal and dangerous. Some areas have mosquito issues at certain times. Research local wildlife before you go.
Recommended Gear for Sand Camping
The right equipment transforms beach camping from a struggle into a pleasure. After years of trial and error, here are the products that actually work for sand camping conditions.
1. COBARYEN Tent Stakes - Best Sand Anchors
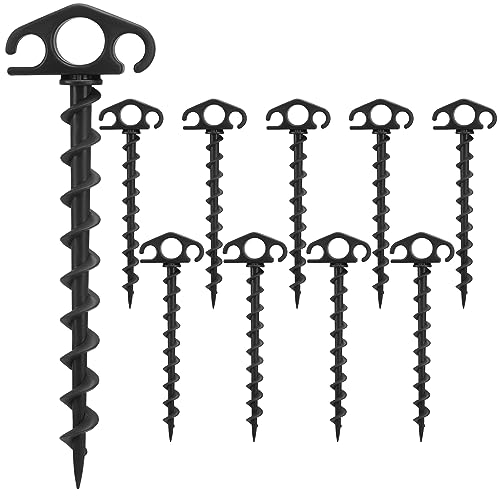
COBARYEN Tent Stakes Ground Anchors Screw in...
Type: Screw-in spiral
Length: 9.4 inches
Pack Size: 10 stakes
Best For: Sand and loose soil
What we like
- Excellent grip in sand
- Easy to screw in
- Holds in windy conditions
- 10 pack covers most tents
What could be better
- May bend in rocky soil
- Requires removal tool or leverage
Standard tent stakes fail completely in sand. These spiral anchors screw into the ground and grip through rotation rather than friction. The 9.4-inch length provides deep anchoring that resists pull-out even in gusty conditions.
I've used these stakes on multiple beach trips and they've held firm when straight stakes pulled out. The screw-in design means you don't need to bury them horizontally or create deadman anchors. Just twist them in at an angle pointing away from your tent and they lock into place.
The 10-pack covers most 2-3 person tents with all guy lines staked. They're specifically designed for sand and loose soil where traditional stakes fail. If you only upgrade one piece of gear for beach camping, make it your stakes. The difference in holding power is dramatic.
The heavy-duty metal construction withstands repeated use. I've had mine for three seasons and they show minimal wear despite regular beach use. They do require some effort to remove—a twisting motion or stake puller helps. But that resistance is exactly what makes them work.
2. Clostnature Tent Footprint - Best Ground Protection

Clostnature Tent Footprint - Waterproof Camping...
Type: Tent footprint
Material: Waterproof polyester
Weight: Ultralight
Includes: Storage bag
What we like
- Protects tent floor from sand
- Waterproof construction
- Ultralight for backpacking
- Doubles as sitting area
What could be better
- Sizing may not match all tents perfectly
Sand acts like sandpaper on your tent floor. I noticed abrasion marks after just one beach trip without a footprint. This Clostnature footprint adds a critical barrier layer between your expensive tent and the abrasive ground.
The waterproof construction prevents moisture from seeping through—even damp sand stays dry underneath. I've camped on damp beaches and stayed completely dry inside. The ultralight design adds minimal weight to your pack, which matters if you're carrying gear to your campsite.
What I especially like is the versatility. This footprint doubles as a ground cloth for sitting outside your tent. I've used it as a picnic blanket, cooking area surface, and equipment clean zone. The included storage bag keeps it contained when not in use.
Sizing is worth checking before you buy. Make sure the footprint dimensions match or slightly exceed your tent floor. I wish it came in more size options, but the standard size works for most 2-person backpacking tents.
3. Azarxis Camping Tarp - Best Wind Break

Azarxis Waterproof Camping Tent Tarp Hammock Rain...
Size: 5 x 7 feet
Material: Waterproof polyester
Color: Army Green
Uses: Multiple camping applications
What we like
- Multi-purpose use
- Waterproof construction
- Affordable price
- Grommets for easy setup
What could be better
- Grommets could be stronger
- Material thin in some areas
A wind break transforms your beach camp from exposed to comfortable. This Azarxis tarp creates a crucial wind barrier that makes cooking, relaxing, and even sleeping much more pleasant. The 5x7 foot size provides adequate coverage for most solo or couple setups.
I set this tarp upwind of my tent using the grommets and guy lines. The wind shadow effect is immediate and substantial. Cooking becomes easier, sand stays more contained, and you can actually sit outside without being blasted. I've even slept under it on warm nights with no rainfly.
The waterproof construction means it doubles as rain protection if needed. Beach weather can change quickly—having a versatile tarp covers multiple scenarios. I've used it as sun shade, rain fly, wind break, and ground cloth. That versatility justifies carrying the extra weight.
The army green color blends well with natural surroundings. Some beach campers prefer brighter colors for visibility, but I prefer the lower profile. Just be aware the material is thin in places—I reinforce high-stress grommet points with extra cordage.
4. Therm-a-Rest Z Lite - Best Sleeping Pad for Sand
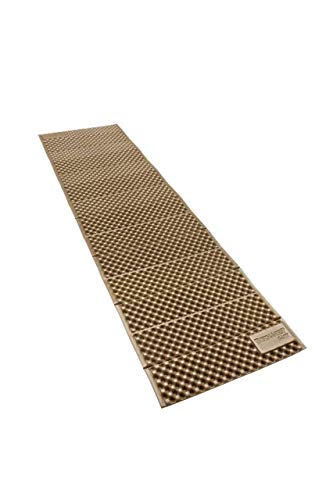
Therm-a-Rest Z Lite Original Camping and...
Type: Closed-cell foam
R-Value: Approx 2.0
Construction: Foam with dimples
Color: Coyote/Grey
What we like
- No sand absorption problems
- Puncture-proof
- Ultralight design
- No inflation needed
What could be better
- Less cushion than air pads
- Bulky when folded
Sand and air pads don't mix well. Sand abrades the fabric and can find its way inside. This closed-cell foam pad eliminates those problems entirely. Sand doesn't stick to, penetrate, or damage the foam material.
The Z Lite has been my go-to for beach camping for years. No worrying about punctures from hidden shells or debris. No sand working its way into valves. Just reliable insulation and comfort that works regardless of conditions. The dimpled pattern provides surprisingly good cushion for a foam pad.
I appreciate that no inflation is needed. Setup takes zero seconds—unfold and you're done. When I've been exhausted after a long day of travel and setup, not having to inflate a mattress is genuinely appreciated. The foldable design makes it easy to pack.
The R-Value of approximately 2.0 provides moderate insulation—adequate for most beach camping conditions in three-season use. For cold weather beach camping, you might want something with more insulation. But for typical summer and shoulder season trips, this pad hits the sweet spot of weight, durability, and comfort.
5. Shibumi Shade 3.0 - Best Beach Canopy
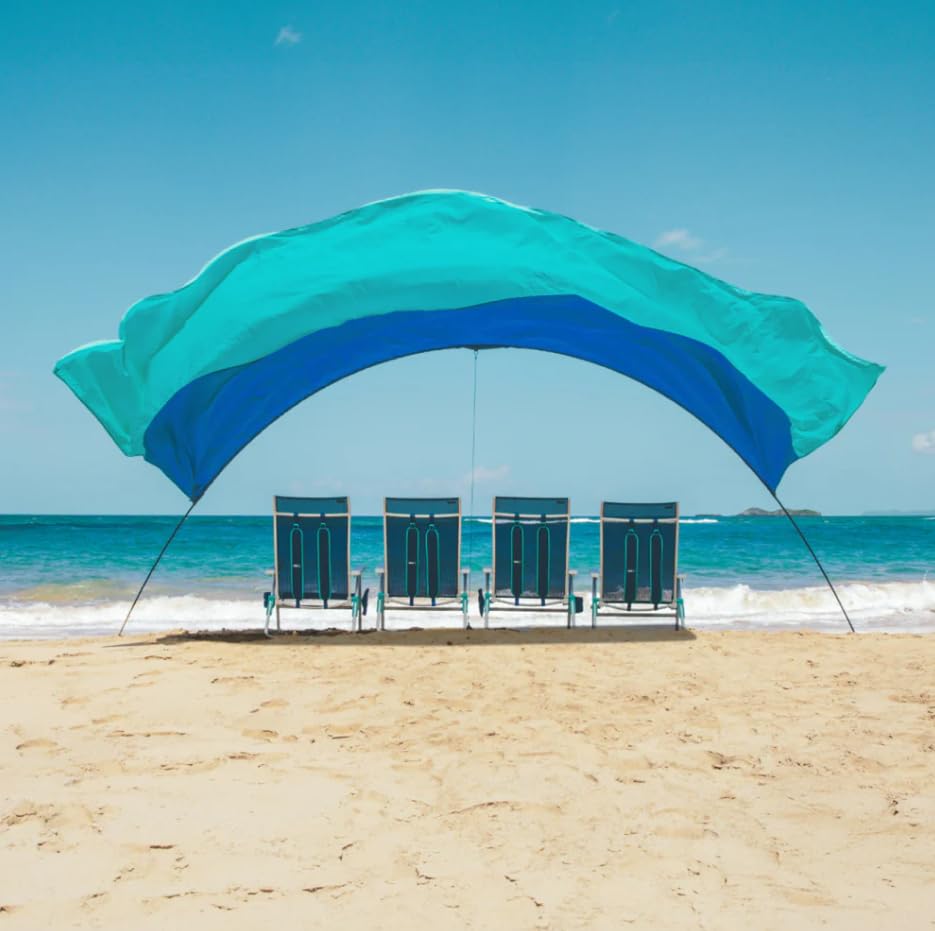
Shibumi Shade Quiet Canopy Version | Beach Tent...
Type: Wind-powered canopy
Setup Time: 3 minutes
Sun Protection: UPF 50+
Coverage: 150 sq ft
What we like
- Incredibly fast 3-minute setup
- Wind-powered no stakes needed
- 150 sq ft coverage
- UPF 50+ sun protection
What could be better
- Requires wind to work properly
- Higher price point
This innovative canopy uses wind to stay aloft rather than relying on stakes and heavy frames. The aerodynamic design catches the breeze and creates stable shade without requiring anchors that pull out of sand. Setup takes literally three minutes.
The 150 square foot coverage is impressive—plenty of room for chairs, coolers, and gear. UPF 50+ sun protection provides serious shelter during peak UV hours. I've spent entire days under this shade without any sun exposure concerns.
What's clever is how the wind powers the system. A steady breeze keeps the canopy lifted and stable. No heavy frame to carry or complicated setup to figure out. This is brilliant for beach camping where wind is abundant but ground anchoring is difficult.
The tradeoff is that it needs wind to work. Calm days mean the canopy sags. You also pay a premium for the innovative design. But for wind-exposed beaches where traditional shade structures struggle, this thing is brilliant. The version 3.0 improvements make it even more stable than earlier models.
Frequently Asked Questions
How do you camp on sand?
Camping on sand requires specialized gear and techniques. Use sand stakes or screw-in anchors rather than regular tent stakes. Set up at least 50-100 feet above the high tide line. Create wind protection with tarps or natural barriers. Manage sand entry with vestibules and entry procedures. Always check tide tables for your entire stay and monitor weather conditions.
What are the best tent stakes for sand?
Spiral sand stakes 12-18 inches long work best for sandy conditions. Screw-in designs grip through rotation rather than friction. Deadman anchors (burying stakes horizontally or attaching lines to buried objects) also work well. Avoid standard 6-8 inch straight stakes—they will pull out in even moderate wind.
How far from the water should you camp on the beach?
Set up camp at least 50-100 feet above the high tide line. Look for the debris line (seaweed, driftwood) marking previous high water levels and camp well above it. During spring tides (new and full moons), add extra buffer as tides run higher than normal. Never camp below the high tide debris line.
How do you keep sand out of your tent?
Establish designated entry procedures: shake off thoroughly before entering, remove sandy footwear, and use a vestibule as a transition zone. Keep a whisk broom outside your tent for regular sweeping. Place a footprint under your tent that extends beyond the floor edges. Zip doors slowly to avoid jamming sand in the teeth.
Do you need a special tent for beach camping?
No special tent is required, but certain features help. Look for tents with multiple guy out points for better anchoring, full-coverage rainflies for wind protection, and vestibules for sandy gear storage. Any quality tent will work if properly anchored with sand stakes. The key is technique and anchoring, not tent design.
How do you anchor a tent on sand?
Screw-in spiral stakes provide the best holding power in sand. Alternatively, use the deadman method: bury a stake, rock, or sandbag horizontally in a trench and attach your guy line to it. Burying guy lines themselves in U-shaped trenches also works. Always use every stake loop your tent has for maximum stability.
Can you camp anywhere on the beach?
No, beach camping is heavily regulated. Many beaches prohibit camping entirely. Others require permits or restrict camping to designated zones. Research regulations before you go—contact local authorities, check park websites, and permit requirements if applicable. Never assume beach camping is allowed without verification.
The Bottom Line
Camping on sand introduces challenges that traditional camping guides never address. After multiple trips and lessons learned the hard way, here's what actually matters:
- Critical Priority: Tide safety - Camp 50-100 feet above high tide line, more during spring tides. This is non-negotiable.
- Best Gear Upgrade: Sand stakes - Regular stakes will pull out. Spiral anchors make the difference between a successful trip and tent failure.
- Most Overlooked: Sand management - A whisk broom and entry procedures keep your camp livable.
- Key Principle: Respect the environment - Check regulations, protect wildlife, leave no trace.
Beach camping rewards preparation with experiences most people never have. Wake up to waves. Watch sunrise over the ocean. Fall asleep under more stars than you knew existed. The extra effort is worth it.
Final tip: Always test your setup at home before a beach trip. Practice staking techniques. Know your gear. The beach is the wrong place to learn that your stakes don't work.

![Women's Hiking Boot Guide: 8 Best Boots Tested in [cy]](https://www.aquamarinepower.com/wp-content/uploads/2026/07/featured-update-19403-1784613974356-300x225.jpg)
![Best Bushcraft Pants [cy]: Complete Guide](https://www.aquamarinepower.com/wp-content/uploads/2026/07/featured-update-19082-1784613963232-300x225.jpg)