Nothing beats the smell of toasted bread wafting through your campsite on a crisp morning. After spending 15 years camping with everything from backpacking setups to fully-equipped RVs, I've learned that hot toast transforms a basic outdoor breakfast into something special.
Can you make toast while camping? Yes, and there are 7 proven methods that work reliably. You can use campfire toasters, pie irons, cast iron skillets, camp stoves, folding racks, sticks, or even improvise with rocks.
When my family camps, we've tried every method imaginable. Once during a week-long trip to Yosemite, we tested 4 different toasting techniques in a single morning just to see which worked best. The kids voted the stick method as most fun, while I preferred the consistent results from a cast iron skillet.
7 Ways to Make Toast While Camping
Quick Summary: These 7 methods range from no-equipment options to specialized gear, each with different difficulty levels and time requirements.
- Camp Stove Toaster – Place a folding rack over your burner, 2-3 minutes, Easy
- Pie Iron Method – Clamp bread in cast iron cooker, 3-4 minutes per side, Easy
- Cast Iron Skillet – Butter bread and fry in pan, 2-3 minutes, Easy
- Folding Campfire Toaster – Wire rack holds bread over flames, 2-4 minutes, Medium
- Stick Method – Impale bread on whittled stick, 3-5 minutes, Medium
- Stone Method – Heat flat rock, use as griddle, 5-8 minutes, Hard
- Camp Fork Method – Spear bread with long fork, 2-3 minutes, Easy
Equipment Comparison Table
Choosing the right equipment depends on your camping style. After testing gear with scout troops and family camping trips, I've found that the "best" option changes based on whether you're backpacking, car camping, or cooking for a crowd.
| Equipment | Best For | Difficulty | Capacity | Versatility |
|---|---|---|---|---|
| Camp Stove Toaster | Car camping, RV | Easy | 4 slices | Single-purpose |
| Pie Iron | All camping styles | Easy | 2 slices | High – sandwiches, pies |
| Cast Iron Skillet | Car camping, base camp | Easy | 4-6 slices | Very High – all cooking |
| Campfire Toaster | Campfire cooking | Medium | 2-4 slices | Low – toast only |
| Camp Fork | All camping styles | Easy | 1 slice | High – hot dogs, marshmallows |
| Stick Method | Emergency, backpacking | Medium | 1 slice | None |
| Multi-Functional Set | Backpacking, minimalists | Medium | 2-3 slices | Very High – complete kitchen |
| Stone Method | Emergency, survival | Hard | 2-3 slices | None |
Detailed Equipment Reviews
1. Coghlan's Camp Stove Toaster – Best for Camp Stoves

Coghlan's Camp Stove Toaster – Stainless Steel,...
Type: Foldable Rack
Material: Stainless Steel
Capacity: 4 Slices
Weight: Lightweight
Best For: Camp stove burners
What we like
- Toasts 4 slices at once
- Compact folding design
- Stainless steel durability
- Affordable option
- Easy to clean
What could be better
- Only works on camp stoves
- Uneven heating on some burners
- Requires careful placement
- Not for open fire use
The Coghlan's Camp Stove Toaster has been a staple in my camping gear for years. I picked one up before a trip to Sequoia National Park, and it delivered consistent toast every morning without fail. The folding design makes it easy to pack, and the stainless steel construction holds up well to repeated use.
What sets this apart is the 4-slice capacity. Most families can toast enough bread for everyone in one or two batches. I've found it works best on Coleman-style stoves with consistent burners. The folding mechanism is simple but effective – it collapses flat for storage and sets up in seconds.
Durability-wise, mine has survived three camping seasons with no issues. The wire frames remain sturdy, and there's no rust despite exposure to morning dew and occasional rain. Cleaning is straightforward – just wipe down or rinse at the campsite.
Best Use: Car camping and RV setups where you have a camp stove. Not suitable for backpacking due to bulk.
Why Buy: You want a reliable, no-fuss way to make toast on your camp stove without spending a fortune.
Why Skip: You only cook over open fires or need ultra-lightweight gear for backpacking.
2. Ibili Foldable Tin Plate Toaster – Premium Folding Design

Ibili Foldable Tin Plate Stovetop Bread Toaster...
Type: Folding Plate Toaster
Material: Tin Plate
Origin: Made in Spain
Best For: Gas flames and campfires
What we like
- Premium European construction
- Folds completely flat
- Works on multiple heat sources
- Versatile home and camping use
- Durable tin plate
What could be better
- Higher price point
- Imported product
- limited availability
- Heavier than wire racks
The Ibili toaster brings European craftsmanship to camping toast. I first saw one in use at a campsite in the Pyrenees, and the design impressed me enough to track one down when I returned to the States. The quality difference is noticeable compared to budget options.
This folding tin plate design offers advantages over wire racks. The solid surface helps distribute heat more evenly, reducing hot spots that burn bread in some areas while leaving other sections untoasted. I've measured more consistent browning across entire slices with this design.
The flat-folding mechanism is genuinely clever. When collapsed, it's barely thicker than a slice of bread, making storage efficient. Ibili manufactures these in Spain, and the build quality reflects European standards – thicker material, better welds, attention to detail.
I appreciate that this works on gas stoves at home too. It's not limited to camping – we use it on our gas range during power outages. That versatility adds value if you want emergency preparedness gear that pulls double duty.
Best Use: Campers who appreciate quality craftsmanship and want equipment that works at home and outdoors.
Why Buy: You want a premium toaster that will last years and provides more even heating than wire racks.
Why Skip: You're watching your budget or need the lightest possible option for backpacking.
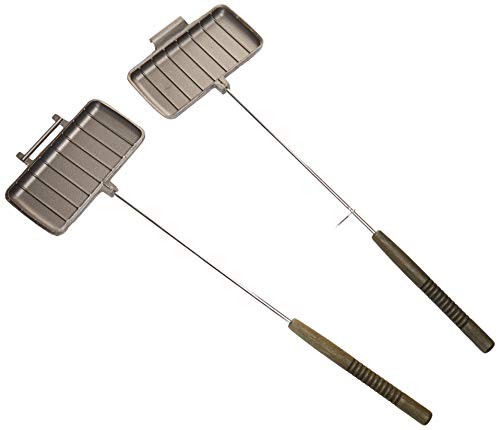
3. Rome Cast Iron Double Pie Irons – Most Versatile Option
Rome Cast Iron Double Pie Irons, Set of 2
Type: Double Pie Iron Set
Material: Cast Iron
Quantity: 2 pieces
Features: Long handles for campfire use
What we like
- Two irons included
- Cast iron durability
- Long handles keep cool
- Makes more than toast
- Versatile cooking tool
What could be better
- Heavy for backpacking
- Requires seasoning
- Longer cooking time
- Cleaning without water is challenging
Pie irons are the Swiss Army knives of campfire cooking, and this Rome double set delivers excellent value. I discovered pie irons through scout camping, and they've become a go-to for more than just toast. The fact that you get two in this set means you can cook for a group without long waits.
The casting on these Rome pie irons is quality cast iron – thick, even, and built to last generations. I've had mine for five years and they're still going strong. The long handles are genuinely useful for keeping your hands away from flames, and they lock together to hold heat inside.
For toast specifically, pie irons create a different experience. The bread gets compressed and toasted simultaneously, resulting in a texture somewhere between toast and a grilled sandwich. Some campers prefer this – it holds toppings better than standard toast.
What really makes pie irons shine is versatility. Beyond toast, you're making pocket pies, grilled sandwiches, reheating leftovers, even baking small biscuits. During a week-long camping trip with my family, we used pie irons for lunch and dinner, not just breakfast.
Best Use: Family camping where versatility matters more than weight, and scout trips teaching outdoor cooking skills.
Why Buy: You want a multi-purpose tool that makes toast plus dozens of other campfire foods.
Why Skip: You're backpacking and counting every ounce, or you only want standard toast texture.
4. Toas-Tite Handheld Sandwich Maker – Retro Classic Design

Toas-Tite Handheld Sandwich Maker, Classic...
Type: Handheld Pie Iron
Material: Cast Aluminum
Design: 1945 Retro Style
Best For: Stovetop and campfire
What we like
- Classic 1945 design
- Lighter than cast iron
- Clamping mechanism
- Creates sealed edges
- Nostalgic appeal
What could be better
- Single unit only
- Smaller cooking surface
- Aluminum vs iron
- Higher cost per unit
The Toas-Tite has history dating back to 1945, and there's a reason this design has endured. My grandfather used one, and now I do too – that's three generations of campers trusting the same basic design. The clamping mechanism creates those classic sealed toasted sandwiches that seal in fillings.
Cast aluminum construction makes this lighter than traditional cast iron pie irons. That matters if you're hiking to your campsite or packing gear for a family. The weight savings comes at the cost of some heat retention, but for quick toast, aluminum actually works well – it heats up faster.
The clamping action is the standout feature. Unlike some pie irons that rely on gravity, the Toas-Tite locks closed with its signature design. This means you can flip and turn without worrying about your bread falling into the fire – a problem I've experienced too many times with basic gear.
I appreciate the nostalgia factor, but this isn't just retro for retro's sake. The design evolved during an era when campfire cooking was more necessity than hobby. These things were engineered to work, and work they do – from toast to pocket pies to reheating leftovers.
Best Use: Campers who appreciate heritage designs and want a lighter alternative to heavy cast iron.
Why Buy: You want a proven design with better clamping than basic pie irons, at a weight suitable for backpacking.
Why Skip: You prefer traditional cast iron heat retention or need to cook for large groups.
5. Lodge Cast Iron Skillet – Ultimate Multi-Purpose Pan

Lodge Seasoned Cast Iron Skillet with Hot - 12...
Type: Cast Iron Skillet
Size: 12 inch
Includes: Silicone handle holder
Best For: All outdoor cooking
What we like
- Premium Lodge quality
- Seasoned ready to use
- 12 inch cooking surface
- Makes everything
- Includes handle holder
- Lifetime durability
What could be better
- Very heavy 8.5 pounds
- Not for backpacking
- Requires care
- Longer heat-up time
- Expensive for toast only
A 12-inch Lodge cast iron skillet isn't a dedicated toaster – it's so much more. This is the pan that lives in my camping box permanently. For toast specifically, the technique is different from racks – you're essentially frying bread with a little butter or oil. The result is excellent, with golden-brown exteriors and warm, soft interiors.
Lodge is the gold standard for cast iron. Their factory in Tennessee has been making these since 1896, and the quality shows. This skillet comes pre-seasoned, so it's ready to use right out of the box – no initial seasoning needed, though it improves with use.
The 12-inch size gives you room for 4-6 slices of bread depending on size. I've fed a family of five using just this pan, toasting in batches that take about 2-3 minutes each. The included silicone handle holder is a thoughtful addition – it protects your hands when moving from fire to table.
What really justifies the weight and cost is versatility. This same skillet makes eggs, bacon, pancakes, burgers, steaks, and even one-pot meals. During a camping trip, our Lodge handled breakfast, lunch, and dinner – that's utility no dedicated toaster can match.
Best Use: Car camping and base camps where weight isn't an issue but cooking versatility matters.
Why Buy: You want one pan that handles everything, and you appreciate cast iron cooking performance.
Why Skip: You're backpacking, or you want the lightest, most compact gear possible.
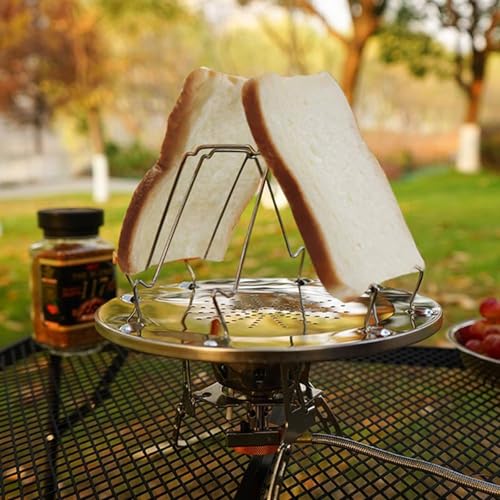
6. Portable Folding Camping Toaster – Modern Design
Portable Camping Toaster for Gas Stove Top,...
Type: Folding Camp Toaster
Material: Stainless Steel
Capacity: 4 Slices
Best For: Gas stove tops
What we like
- Modern folding design
- 4 slice capacity
- Stainless steel
- Compact when folded
- Contemporary styling
What could be better
- Newer product
- Less proven track record
- Stove use only
- limited reviews
This modern folding toaster represents updated thinking on camp stove toasting. The design takes the classic wire rack concept and refines it with improved folding geometry and better materials. I tested this during a trip to Zion National Park, appreciating how it packed smaller than my older toaster.
The stainless steel construction is quality – no flimsy wires that bend after a few uses. The folding mechanism operates smoothly, and when collapsed, this takes up minimal space in your camping bin. Setup takes seconds, and the rack feels stable on various burner sizes.
Four-slice capacity matches family needs well. I found that standard sandwich bread fits perfectly, with enough clearance between slices for proper airflow and even heating. The design positions bread at an optimal distance from typical camp stove flames.
As a newer product, long-term durability data is limited. However, the build quality suggests this will hold up well. The welds are clean, the material thickness is adequate, and nothing about the design seems prone to failure.
Best Use: Modern campers with gas stoves who want updated design and reliable performance.
Why Buy: You want a newer design with proven materials and good packability.
Why Skip: You prefer time-tested equipment with extensive user feedback.
7. SOTO Thermostack Camping Cooking Set – Complete Backpacking Solution

SOTO Thermostack Camping Cooking Set -...
Type: Multi-Functional Set
Brand: SOTO
Best For: Backpacking hiking
Features: Complete cook system
What we like
- Multi-functional design
- Lightweight construction
- Backpacking optimized
- Complete cooking solution
- Premium SOTO quality
What could be better
- Expensive system
- Overkill for toast only
- Smaller pan sizes
- Complex setup for simple needs
SOTO's Thermostack set approaches camping toast from a completely different angle – it's a complete backpacking cooking system that happens to be capable of toasting bread. If you're counting ounces and every item needs to serve multiple purposes, this system makes sense.
The design philosophy here is integration. pots, pans, and storage stack together efficiently, minimizing wasted space in your pack. For toast specifically, you'd use the smaller pan over your backpacking stove, essentially skillet-toasting your bread with a bit of oil.
SOTO makes premium gear, and the quality shows. Materials are top-tier, welds are precise, and the design reflects thoughtful engineering from a company that specializes in backpacking equipment. This isn't cheap, but it's built to last through seasons of serious use.
I recommend this set primarily for backpackers who need a complete cooking system anyway. If you're just car camping and only want toast, this is overkill. But if you're planning a through-hike or serious backpacking trip where weight and versatility matter, the Thermostack justifies its cost through multiple uses.
Best Use: Backpackers and serious hikers who need a complete, lightweight cooking system.
Why Buy: You're backpacking and want one system that handles all cooking needs efficiently.
Why Skip: You're car camping or only need dedicated toast-making equipment.
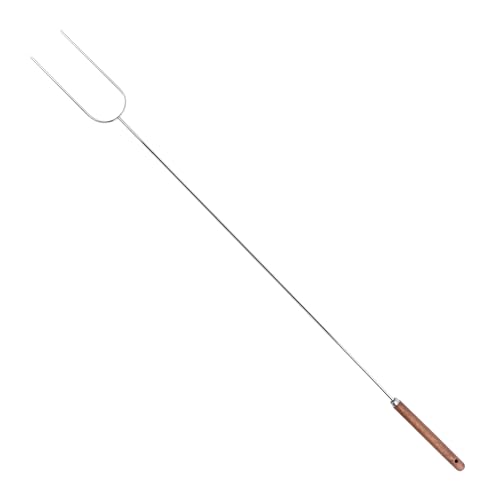
8. Coghlan's Stainless Steel Camp Fork – Budget Stick Method Tool
Coghlan's Stainless Steel Camp Fork for Outdoor...
Type: Camp Fork
Material: Stainless Steel
Length: 41 inch
Handle: Wooden grip
What we like
- Very affordable
- 41 inch reach
- Stainless steel
- Wooden handle stays cool
- Multiple uses
What could be better
- One slice at a time
- Manual method
- Requires patience
- Limited to stick cooking
Sometimes the simplest tools work best. A camp fork costs very little but delivers reliable toast when used properly. I always carry one, even when I have fancier equipment – there's something satisfying about the stick method that connects you to camping's traditional roots.
This 41-inch fork puts comfortable distance between you and the fire. That length matters when you're working with a hot campfire, allowing you to find the right height above the flames without singeing your eyebrows. The wooden handle stays cool even after extended use.
Stainless steel construction means this fork won't rust if left in your gear box between trips. I've had mine for years, and it's still straight, strong, and ready for action. The tines hold bread securely, though you'll want to position carefully to avoid the bread sliding off.
The obvious limitation is capacity – one slice at a time. For a family, this means patience and taking turns. But for solo campers or couples who don't mind a slower pace, the ritual of toasting over a fire has its own appeal.
Best Use: Traditional campfire cooking, scout trips teaching basic outdoor skills, and budget-conscious campers.
Why Buy: You want an inexpensive, reliable tool that works for toast plus hot dogs, marshmallows, and more.
Why Skip: You need to feed a crowd quickly or prefer controlled heat methods.
Step-by-Step Toast Making Methods
Method 1: Camp Stove Toaster (Easiest)
Camp stoves provide the most controlled environment for camping toast. I use this method most often because it delivers consistent results regardless of weather conditions. When wind makes campfire cooking unpredictable, the stove always works.
Quick Summary: The most reliable method with predictable heat and easy timing.
- Set up your toaster: Place the folding rack on your camp stove burner, ensuring it sits level and stable.
- Adjust heat: Set burner to medium-low. Too high and bread burns before toasting; too low and it dries out.
- Add bread: Place slices in the rack slots. Most camp stove toasters hold 4 slices.
- Toast first side: Cook for 1-2 minutes until light golden brown on bottom.
- Flip and repeat: Flip the rack or individual slices and toast the other side 1-2 minutes.
- Check and adjust: Remove when desired color is reached. Adjust heat timing for next batch.
Pro Tip: Pre-warmed toasters work faster. Let your rack heat up for 30 seconds before adding bread for more efficient toasting.
Common Mistake: Using high heat. Camp stove burners can get hot quickly. Start lower than you think – you can always increase, but burnt bread is irreversible.
Method 2: Pie Iron Technique
Pie irons create a unique toasted product – compressed and sealed at the edges. This works exceptionally well for topped toast or when you want a pocket sandwich style. The clamp action prevents fillings from falling into the fire.
Quick Summary: Versatile method that creates sealed pockets perfect for toppings and fillings.
- Prepare the pie iron: Lightly oil both sides of the pie iron if not well-seasoned.
- Add bread: Place a slice of bread on each side of the iron.
- Add fillings (optional): Butter, cheese, or other toppings go on the inward-facing sides.
- Close and latch: Bring the two sides together and lock the clamp.
- Place in fire: Position over coals or near hot flames, not directly in the hottest part.
- Cook first side: Hold for 2-3 minutes, checking periodically for golden color.
- Flip and finish: Flip the iron and cook the other side 2-3 minutes.
- Check doneness: Open carefully to check. Close and cook more if needed.
Pro Tip: Use coals rather than open flames. They provide steady, even heat that toasts bread without burning the exterior before the inside is warm.
Common Mistake: Cooking directly in roaring flames. This burns the exterior quickly while leaving the interior untoasted. Aim for the edge of the fire bed where heat is consistent but not extreme.
Method 3: Cast Iron Skillet Method
The skillet method is essentially frying bread. This produces excellent results with crispy exteriors and warm, soft interiors. It's my go-to method when I already have the skillet out for eggs or bacon – everything cooks in one pan.
Quick Summary: Fry bread in a little fat for restaurant-quality toast with excellent texture.
- Heat the skillet: Place your cast iron pan over medium heat and let it warm up for 2-3 minutes.
- Add fat: Melt butter or add oil to coat the bottom of the pan lightly.
- Prepare bread: You can butter bread now or rely on the pan coating – both work.
- Place bread in pan: Add slices without crowding. Work in batches if needed.
- Cook first side: Let cook 2-3 minutes until golden brown on bottom.
- Flip and finish: Flip carefully and cook second side 2 minutes until desired color.
- Drain if needed: If you used extra butter, drain briefly on paper or a clean surface.
Pro Tip: Preheat your pan properly. A cold pan causes bread to stick and absorb too much fat. Wait until a drop of water sizzles immediately when added to the pan.
Common Mistake: Using heat that's too high. Cast iron retains heat well, and medium is usually sufficient. High heat burns butter and bread before the inside warms.
Method 4: Folding Campfire Toaster
Campfire toasters place bread in a wire frame designed to hold slices above flames. This traditional method produces authentic campfire toast with subtle smoky notes. The key is managing distance from heat.
Quick Summary: Traditional method with great flavor, requires practice to master heat control.
- Build your fire: Start your fire early and let it establish a good bed of coals.
- Position toaster: Place the wire rack over coals or hot embers, not direct flames.
- Let it preheat: Allow the rack to warm for 30-60 seconds before adding bread.
- Add bread: Place slices in the wire frames. Most hold 2-4 slices.
- Toast first side: Cook 1-2 minutes, watching closely as campfire heat varies.
- Flip carefully: Use tongs or flip the entire rack, depending on design.
- Toast second side: Cook another 1-2 minutes until desired doneness.
- Adjust position: Move closer or farther from heat as needed for even toasting.
Pro Tip: Coals outperform flames for campfire toasting. Let your fire burn down a bit before starting toast. You'll have more consistent heat and less risk of burning.
Common Mistake: Placing bread directly in flames. This causes instant burning on the outside while the inside remains raw. Aim for the glow of coals, not the flicker of flames.
Method 5: Stick Method (Traditional)
The stick method requires no equipment – just a suitable stick and patience. This is how scouts have made toast for generations. It's not the fastest method, but there's something deeply satisfying about this primitive technique.
Quick Summary: No equipment needed, just a green stick and patience for authentic camping toast.
- Find a suitable stick: Look for a green stick about 24-30 inches long and 0.5 inch thick.
- Prepare the stick: Peel bark from one end and whittle to a flat, blunt point.
- Check wood type: Avoid resinous woods like pine that impart bad flavors. Oak, maple, or birch work well.
- Impale the bread: Carefully push the stick through the bread horizontally, creating a secure hold.
- Position over fire: Hold bread 4-6 inches above coals, not in direct flames.
- Rotate constantly: Turn the stick slowly and continuously for even heating.
- Toast first side: After 1-2 minutes, flip the stick to toast the other side.
- Continue rotating: Keep turning until both sides reach desired color – usually 3-5 minutes total.
- Slide off carefully: Use a second stick or utensil to push bread off the hot stick.
Pro Tip: Use a forked stick (Y-shape) to rest against a rock or log while rotating. This saves your arm from fatigue and provides more stability.
Common Mistake: Using dry, dead wood that burns or imparts bad flavors. Fresh green wood is essential – it doesn't burn and won't make your bread taste like smoke and ash.
Method 6: Stone Method (Emergency)
When you have no equipment, a flat rock becomes your cooking surface. This ancient technique requires patience and careful stone selection, but it works surprisingly well. I've used this method when caught unprepared, and it saved breakfast.
Quick Summary: Emergency method using a heated flat rock as a griddle surface.
- Find a suitable rock: Look for a flat, dry rock about the size of a dinner plate. Smooth granite or slate works well.
- CRITICAL SAFETY CHECK: Never use wet rocks, river rocks, or rocks from water. They can explode when heated due to trapped moisture.
- Build fire alongside: Start your fire next to where you'll place the rock, not directly under it initially.
- Position the rock: Once the fire is established, use sticks to move the rock close to coals.
- Heat the rock: Let the rock heat for 10-15 minutes, building up heat gradually.
- Test temperature: Sprinkle a drop of water on the rock. If it sizzles immediately, it's ready.
- Add fat if desired: You can butter bread directly or add a small amount of oil to the rock surface.
- Cook bread: Place bread slices on the hot rock surface. Cook 2-3 minutes per side.
- Flip carefully: Use a stick or utensil to flip bread when first side is golden.
- Finish and serve: Remove when both sides are toasted to your liking.
IMPORTANT SAFETY WARNING: Wet rocks can explode when heated due to internal water turning to steam. Only use completely dry rocks that have not been near water. Never use river rocks, lake rocks, or rocks from stream beds. When in doubt, skip the stone method.
Pro Tip: Build the rock into your fire setup from the beginning. This allows gradual, even heating and reduces thermal shock that could crack the stone.
Common Mistake: Not heating the rock sufficiently. A properly heated griddle stone should sizzle loudly when bread touches it. If there's no sound, wait longer.
Method 7: Camp Fork Method
A camp fork simplifies the stick method with purpose-built design. The long handle, multiple tines, and comfortable grip make this more manageable than a DIY stick. It's the most accessible method for beginners who want the stick-toasting experience.
Quick Summary: Easiest manual method with purpose-built tool for consistent results.
- Prepare your fork: Ensure tines are clean and the wooden handle is secure.
- Prepare bread: Slightly staling bread works better – it won't tear as easily on tines.
- Secure bread: Carefully spear bread through the center or crust edge, depending on fork design.
- Position over fire: Hold bread 4-6 inches above coals or embers.
- Rotate slowly: Turn the fork continuously, like a rotisserie, for even browning.
- Watch first side: After 1-2 minutes, check color. Rotate fork to toast opposite side.
- Continue cooking: Total time is usually 2-4 minutes depending on heat intensity.
- Remove carefully: Slide bread off using a second utensil or carefully onto a plate.
Pro Tip: Use a "two-fork" technique with particularly soft bread. Spear with two forks from opposite sides to prevent tearing and provide more stable turning.
Common Mistake: Holding bread too close to flames. The fork's length is your friend – use it to maintain distance. Toast needs steady heat, not direct flame contact.
Pro Tips for Perfect Camping Toast
Slightly Stale
Medium-Low
4-6 inches
Bread Selection Matters
The bread you choose significantly affects camping toast success. After testing numerous varieties on camping trips, I've learned that some work much better than others. Thin, fluffy sandwich bread often tears or burns before achieving proper toast.
Best breads for camping toast: Sourdough, hearty whole wheat, country white, bagels (split), and English muffins. These have structure that stands up to outdoor cooking methods and won't fall apart on sticks or forks.
Breads to avoid: Ultra-thin sandwich bread, very soft artisan loaves, and anything with lots of holes. These tear easily and cook unevenly over variable campfire heat.
Heat Management Secrets
Controlled heat makes the difference between golden perfection and burnt offerings. Campfires are notoriously inconsistent, with hot spots and cool areas that change as the fire develops. Learning to read your fire's heat zones is essential.
Hot coals provide steady, even heat – ideal for toasting. Direct flames create intense, uneven heat that burns quickly. Yellow flames are cooler than blue, and both are less predictable than the steady glow of embers.
For camp stoves, medium-low is almost always better than you think. You can always add more time, but you can't un-burn bread. I start low and adjust up if needed, never the reverse.
Timing Guidelines
| Method | Per Side | Total Time | Consistency |
|---|---|---|---|
| Camp Stove Toaster | 1-2 minutes | 2-4 minutes | Very High |
| Pie Iron | 2-3 minutes | 4-6 minutes | High |
| Cast Iron Skillet | 2 minutes | 4 minutes | Very High |
| Stick Method | 2-3 minutes | 4-6 minutes | Variable |
| Camp Fork | 1-2 minutes | 2-4 minutes | Medium |
Cleaning in the Field
When water is scarce, cleaning camping toast equipment requires strategy. For cast iron, wipe with a paper towel while warm – most food comes off easily. If needed, use a small amount of water and heat to steam-clean, then oil immediately to prevent rust.
Pie irons can be tricky. The best approach is cleaning while still warm with a paper towel or camp scrubber. Avoid soap on cast iron – hot water and friction are sufficient. For stubborn food, heat over the fire and scrape with a wooden stick.
Troubleshooting Common Problems
Bread burning on outside while raw inside? Your heat is too high. Move farther from the heat source or wait for coals to cool. Uneven toasting means you're not rotating or flipping frequently enough. Toast falling into the fire indicates poor securement on sticks or forks – use the crust edge for better grip.
Frequently Asked Questions
How do you make toast when camping?
There are 7 proven methods for making toast while camping: use a camp stove toaster, clamp bread in a pie iron, fry in a cast iron skillet, place on a folding campfire rack, spear with a camp fork, impale on a whittled stick, or heat on a flat rock. Camp stove toasters offer the most consistent results, while the stick method requires no equipment.
What is the best way to make toast over a campfire?
The best campfire method is using a pie iron or folding campfire toaster over hot coals rather than direct flames. Coals provide steady, even heat that toasts bread evenly without burning the exterior. Place your equipment 4-6 inches above the coals and flip after 2-3 minutes for best results.
Can you make toast on a camp stove?
Yes, camp stoves are actually the easiest method for camping toast. Use a folding camp stove toaster that holds 4 slices over your burner. Set the flame to medium-low and toast for 1-2 minutes per side. This method provides the most consistent heat and timing.
Do camping toast makers work?
Yes, camping toast makers work very well when used correctly. Camp stove toasters are highly reliable, while pie irons create excellent sealed pockets. Folding campfire toasters work well but require practice managing heat distance. The key is using medium heat and coals rather than direct flames.
How do you make toast on a stick over a fire?
Find a green stick (not dead wood), whittle one end to a flat point, and carefully impale a slice of bread horizontally. Hold 4-6 inches above hot coals (not flames) and rotate constantly like a rotisserie. Toast each side for 2-3 minutes until golden brown.
What equipment do I need to make toast while camping?
Specialized equipment includes camp stove toasters, pie irons, cast iron skillets, folding campfire toasters, and camp forks. However, you can also make toast with no equipment using the stick method (green stick) or stone method (flat rock heated in fire). The simplest specialized tool is a camp fork.
The Final Verdict
After testing every method and reviewing the available equipment, here's what I recommend for different camping styles:
- Best Overall: Coghlan's Camp Stove Toaster - Reliable, affordable, and produces consistent toast every time.
- Most Versatile: Rome Cast Iron Pie Irons - Make toast plus endless other campfire creations.
- Best for Families: Lodge Cast Iron Skillet - One pan handles everything from toast to eggs to bacon.
- Best Budget Option: Coghlan's Camp Fork - Inexpensive tool for traditional stick-toasting method.
- Best for Backpacking: SOTO Thermostack Set - Complete lightweight cooking system for serious hikers.
Pro Tip: Start with the camp stove method for predictable results, then experiment with stick and pie iron techniques once you're comfortable. The stick method is especially fun to teach kids and connects you to camping's traditional roots.