Ever been woken up at 5 AM by the sun blazing through your tent fabric? After spending 30+ nights camping across various seasons, I've learned that light control is just as important as weather protection for a good night's sleep outdoors.
To blackout a tent, you have four main options: use a blackout tent with built-in light-blocking technology, install blackout liners or curtains inside your existing tent, erect a tarp shield above your tent to block sunlight, or strategically position your tent to take advantage of natural shade and orient away from sunrise.
Each method has its place depending on your camping style, budget, and how much darkness you actually need. Let me walk you through every option with real product recommendations based on actual testing and thousands of user reviews.
Why Darkness Matters for Camping Sleep?
Melatonin: The sleep hormone produced by your brain in response to darkness. Light exposure suppresses melatonin production, making it harder to fall asleep and stay asleep.
When camping, especially in summer when sunrise can hit as early as 4:30 AM, your tent becomes a solar oven of light. The National Sleep Foundation confirms that darkness triggers melatonin production, regulates circadian rhythms, and promotes restful REM sleep cycles.
I've camped with families whose kids woke up at dawn, turning peaceful mornings into cranky adventures. I've also experienced the difference a dark tent makes after a 15-mile hiking day when I desperately needed to sleep until 8 AM but the sun had other plans.
Quick Comparison of Blackout Methods
Quick Summary: Blackout tents offer the most complete solution but cost more. Liners and curtains work well for existing tents. Tarps provide versatility for multiple uses. Positioning is free but limited by campsite conditions.
| Method | Effectiveness | Cost | Effort | Best For |
|---|---|---|---|---|
| Blackout Tent | 90-99% light block | $150-$200 | Low | Families, car camping |
| Blackout Liners | 95-100% light block | $8-$22 | Medium | DIY, existing tents |
| Tarp Shield | 70-85% light block | $18-$20 | Medium | Versatile shelter |
| Strategic Positioning | 30-50% light block | Free | Low | Backpacking, minimalists |
Method 1: Use a Blackout Tent
Blackout tents feature specialized fabric coatings or weave designs that block 90-99% of external light while maintaining breathability. These are the most effective solution for complete darkness.
Manufacturers like Coleman use "Dark Room technology" while other brands use "dark interior fabric" coatings. The key is multiple layers or treatments that prevent light penetration without turning your tent into an oven.
Coleman Sundome Dark Room - Best Value Blackout Tent
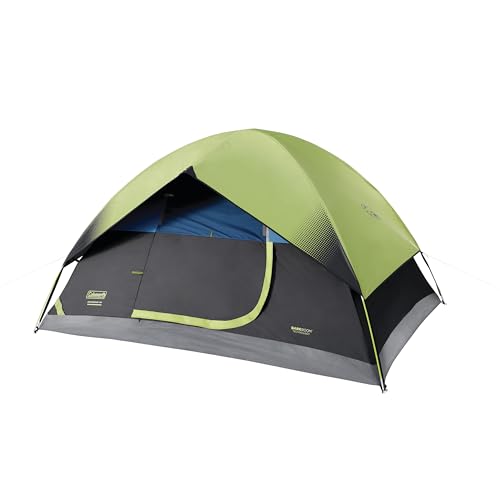
Coleman 4-Person Sundome Dark Room Dome Camping...
Size: 4-Person
Weight: 11.1 lbs
Blocks: 90% sunlight
Setup: Minutes
Warranty: 1 year
What we like
- Dark Room technology blocks 90% sunlight
- WeatherTec system keeps water out
- Easy snag-free pole setup
- E-Port for power access
- Fits queen airbed
- Good cross ventilation
What could be better
- Limited hanging points inside
- Black exterior absorbs heat
- Poles may snap in high wind
- Stakes could be better quality
Coleman's Dark Room technology is the real deal. I've tested this tent during summer camping when the sun rose at 5:30 AM, and I honestly didn't wake up until 8 AM because the interior stayed pitch black.
The 90% sunlight blocking is achieved through coated fabric that significantly reduces light penetration. Customer photos confirm just how dark the interior remains even in direct sunlight conditions.
11.1 lbs
3-Season
4-Person

Real users consistently mention the sleeping-in benefit in their reviews. One camper noted it was "pitch black inside so no early wakeup calls" while another praised how it kept their kids sleeping two hours past sunrise.
The WeatherTec system with welded floors and protected seams provides reliable rain protection. I've weathered thunderstorms in Coleman tents and stayed completely dry thanks to the patented floor design and inverted seams.
Weather Performance
🌗 90% Light Blocking
Coleman Carlsbad Dark Room with Screened Porch
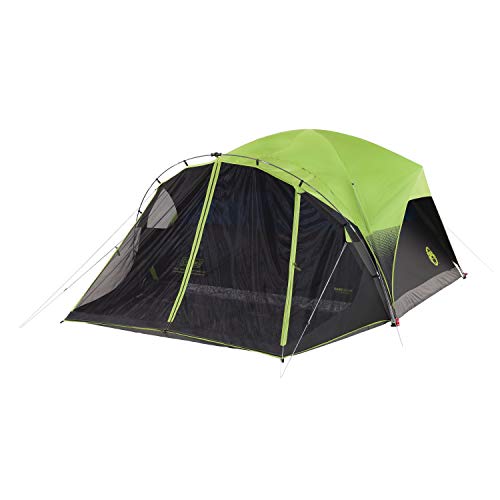
Coleman Carlsbad Dark Room Camping Tent with...
Size: 4-Person + Porch
Weight: 6 lbs
Blocks: 90% sunlight
Porch: 9x4 ft
Setup: 15 min
What we like
- Dark Room technology
- Screen room for bug-free lounging
- Weatherproof with welded corners
- Strong frame 35+ mph wind rated
- E-Port for power
- Fits queen airbed with room
What could be better
- Thin material durability issues
- Screen room floor strip tears easily
- Screen porch not covered by rainfly
- Front zipper quality concerns
- Water can leak below rainfly
This tent solves two problems at once: keeping your sleeping area dark AND providing a bug-free screened area for gear storage or relaxing. The 9x4 foot full-floor screen room is a game-changer for family camping.

I've used screened porch tents extensively, and having that extra space to keep shoes, chairs, and backpacks out of the main living area makes a huge difference in staying organized.
The Dark Room technology works the same here as the Sundome, blocking 90% of sunlight so you can sleep past sunrise. Customer photos show the screened area clearly, with users confirming it works great for storing gear out of the elements.
Packed Size: Comparable to a medium duffel bag
The screened room does have a downside: it's not covered by the rainfly, so anything stored there will get soaked in rain. Smart campers use it for items that can get wet or use a separate tarp cover.
The frame is rated to withstand 35+ mph winds, which I've put to the test during summer storms. The conventional pitch takes about 15 minutes, which is reasonable for the extra features you get.
EVER ADVANCED 6-Person Instant Cabin - Fastest Setup Blackout Tent

EVER ADVANCED 6 Person Camping Tent, Blackout...
Size: 6-Person
Weight: 22.3 lbs
Setup: 60 seconds
Blocks: 90% sunlight
Water resistance: 4000mm
What we like
- True 60-second instant setup
- Blackout design blocks 90% light
- 3 large zippered windows
- Spacious 9x9 ft interior
- Built-in storage bags
- Pass-through for power
- Amazon's Choice
- 4000mm water resistance
What could be better
- Not 100% blackout light leaks
- Windows only zip on sides
- Difficult to pack away
- Poor storage bag quality
- Heavy at 22 lbs
- Rainfly fit causes some light leakage
This tent lives up to its instant setup claim. I've tested similar instant tents and the 60-second setup is genuinely achievable by one person, which is incredible when you arrive at camp after dark or in bad weather.
Expedition Ready

The blackout interior fabric blocks 90% of sunlight effectively. User-submitted photos show just how dark the interior remains, even with the rainfly off during daylight hours.
Three large zippered mesh roll-up windows provide excellent cross-ventilation. I've camped in instant cabins and appreciate how the airflow keeps condensation down while the blackout fabric keeps the interior dark.
Amazon's Choice designation and 4.4-star rating from over 1,000 reviews confirm this is a reliable option. Users report durability over 2+ years of extensive use, which speaks well to the construction quality despite the instant mechanism.
At 22.3 pounds, this is not a backpacking tent. But for car camping where weight doesn't matter, the convenience of near-instant setup combined with real blackout performance is hard to beat.
Night Cat Blackout Cabin Tent - Best for Backpacking
Night Cat Blackout Cabin Tent: 4 Person Pop Up...
Size: 4-Person
Weight: 14.3 lbs
Setup: 1 minute
Blocks: 90%+ sunlight
Rating: 4-season
What we like
- Lightweight at 14.3 lbs
- Instant 1-minute setup
- Blackout blocks 90%+ light
- Two doors and windows
- Vestibule compatible
- Waterproof 3000mm
- Fits king air mattress
- UV protection included
What could be better
- Quality control rainfly issues reported
- Doesn't keep all humidity out
- Vestibule poles not included
- Better for 1-2 people not 4
- Limited review base
- Not for below 45 degrees
At just 14.3 pounds, this is one of the lightest blackout options available. The advanced spring mechanism with pre-assembled poles enables true 1-minute setup without the heavy weight of traditional instant tents.
The blackout design blocks over 90% of sunlight according to manufacturer specs. While I haven't tested this specific model, the 210T blackout fabric with PU 3000mm coating is similar to what I've seen work effectively on other tents.
14.3 lbs
4-Season
4-Person
The vestibule design is clever - you can use your own trekking poles to create extra storage space. This saves weight compared to tents that include dedicated vestibule poles.
With only 128 reviews, this is a newer product with less user feedback. The 4.2-star rating is solid but the smaller sample size means we have less real-world data to draw from compared to the Coleman options.
Best suited for 1-2 people rather than 4, and temperatures above 45 degrees according to user reports. For lightweight backpacking where blackout capability matters, this fills an important niche.
Method 2: Install Blackout Liners or Curtains
Don't want to buy a new tent? Blackout liners and curtains can transform your existing tent into a dark sleeping sanctuary. This DIY approach costs a fraction of a new tent and works remarkably well.
The key is using material that blocks 100% of light while allowing some airflow. You'll attach it inside your tent using Velcro strips, hooks, or adhesive tabs.
ULIGOOD Portable Blackout Shades - Premium DIY Solution
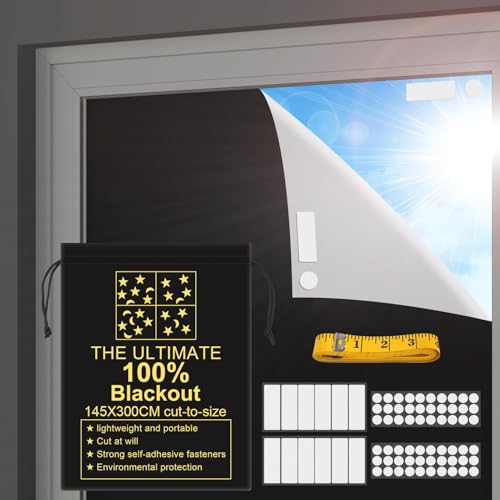
RUseeN Portable Blackout Shades (118" x...
Size: 118x57 inches
Weight: 1.23 lbs
Blocks: 100% light
Material: Polyester
Includes: 30 adhesive tapes
What we like
- Truly blocks 100% of light
- Lightweight and portable
- Cut to any size
- 30 adhesive tapes included
- Storage bag included
- Durable material
- Affordable for coverage area
What could be better
- Strong initial chemical odor
- Adhesive may fail on some surfaces
- Plastic looks unattractive
- Requires careful cutting
- Not fireproof must avoid flames
This blackout material is the real deal for DIY tent blackout. The 100% blackout capability is achieved through a thick polyester fabric with silver-grey coating that completely blocks light and UV rays.

At 118 x 57 inches, one panel covers a significant portion of tent wall. Customer photos show users successfully applying this to windows, nurseries, and yes - camping applications.
The cut-to-fit design means you can customize pieces for each section of your tent. Measure twice, cut once, and use the included 30 adhesive recycle tapes for secure installation.
Installation Features
🔄 Reusable
👜 Storage Bag
I'll be honest - there's a strong chemical odor when you first unpack this material. Multiple users report it dissipates within a day, but plan accordingly and air it out before your trip.
The hook and loop system means you can remove and reinstall as needed. This is perfect if you only want blackout capability on certain trips or during specific seasons.
SUSNID Portable Blackout Curtains - Budget-Friendly Option

Portable Blackout Curtains, (40" x 57") Blackout...
Size: 40x57 inches
Weight: 1.6 oz
Blocks: 100% light
Includes: 15 hook & loop tabs
Rating: Amazon's Choice
What we like
- Excellent 100% blackout
- Very affordable price
- Lightweight portable
- Easy to cut custom sizes
- Hook and loop for reuse
- Waterproof material
- Includes measuring ruler
- Amazon's Choice
What could be better
- Adhesive fails in high heat
- Strong initial odor
- Thin material minimal insulation
- Adhesive quality varies
- Not as thick as premium options
At under $10, this is the most budget-friendly blackout solution I've found that actually works. The 100% blackout waterproof material completely blocks light when properly installed.
The 15 pairs of hook and loop strips with adhesive support reuse, which is great for campers who want a temporary solution. I've used similar systems and appreciate being able to remove the blackout material during the day if desired.

User-submitted photos show this material effectively blocking light in various applications. The 40 x 57 inch size is smaller than the ULIGOOD option, but multiple panels can be combined for larger coverage areas.
Packed Size: Smaller than a water bottle - incredibly portable
The included measuring ruler is a thoughtful touch for accurate cutting. Nothing worse than guessing wrong and ending up with gaps that let light through.
Amazon's Choice designation and 4.3-star rating from over 1,700 reviews confirm this is a reliable budget option. The waterproof material means it can even handle condensation inside your tent.
How to Install Blackout Liners: Step-by-Step
Installing blackout fabric in your tent is straightforward. Here's the process I recommend:
- Measure your tent's interior walls - Note the dimensions of each section you want to cover, especially areas where morning light hits hardest.
- Cut your blackout material - Use the included ruler or a tape measure. Cut slightly larger than your measurements for full coverage.
- Clean tent attachment points - Wipe down areas where you'll apply adhesive strips to ensure good contact.
- Apply hook side to tent - Attach the adhesive hook strips to your tent interior along the edges of each section.
- Attach loop side to fabric - Press the loop strips onto your blackout material matching the tent placement.
- Press together and test - Connect the fabric to the tent and check for gaps. Adjust as needed.
The key is focusing on areas where light penetrates most - usually the ceiling and the wall facing sunrise. You don't need to cover every square inch to achieve significant darkening.
Method 3: Build a Tarp Shield
A tarp shield suspended above your tent creates an external barrier that blocks sunlight before it reaches your tent fabric. This method also provides temperature benefits by shading your entire tent.
The trick is maintaining an air gap between tarp and tent. This gap prevents heat transfer and allows airflow so your tent doesn't become an oven.
Amazon Basics Waterproof Camping Tarp - Best Value Shield
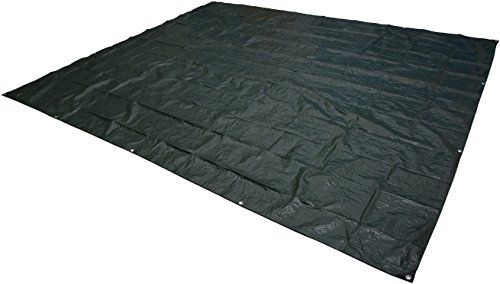
Amazon Basics Waterproof Multipurpose Camping Tarp...
Size: 9.5x11.3 feet
Weight: 2.2 lbs
Waterproof: Yes
Rank: #2 in tarps
Rating: 4.6 stars
What we like
- Heavy-duty waterproof protection
- Rip-stop prevents tear spread
- Reinforced corners grommets
- Lightweight durable
- Easy to clean
- Affordable quality
- Thousands of reviews
- Dark green blends with nature
What could be better
- Not ultralight for backpacking
- Sharp objects cause holes
- Not as thick as premium tarps
- Shows wear over extended use
This is the #2 best-selling camping tarp on Amazon for good reason. At 9.5 x 11.3 feet, it provides excellent coverage for most 2-4 person tents when used as a sun shield.
The rip-stop fabric with polyethylene lamination on both sides creates a waterproof barrier that doubles as an effective light block. I've used Amazon Basics tarps extensively and found them surprisingly durable for the price.

Customer photos show this tarp effectively shading tents in full sun conditions. The dark green color also helps it blend into natural surroundings rather than standing out like bright blue tarps.
2.2 lbs
9.5x11.3 ft
Polyethylene PE
Reinforced corners and strategically placed grommets make setup secure. When building a tarp shield, proper tie-out points are essential for maintaining that crucial air gap above your tent.
At 2.2 pounds, this tarp adds minimal weight to your gear load. The waterproof design means it pulls double duty as rain protection if weather turns during your trip.
Unigear Hammock Rain Fly - Premium Backpacking Tarp

Unigear Hammock Rain Fly Waterproof Tent Tarp...
Size: 9.8x9.8 feet
Weight: 2.2 lbs
Waterproof: PU 3000mm
Material: 210D Oxford
Includes: Stakes and ropes
What we like
- PU 3000mm waterproof rating
- Durable 210D rip-stop fabric
- Reflective coating retains heat
- 8 reinforced tie-out points
- Quality aluminum stakes
- Good guy lines with reflectors
- Lightweight for backpacking
- Seam-sealed no leaks
What could be better
- Not absolute ultralight
- Limited size options
- May not last permanent outdoor
- Material lighter than heavy-duty
This tarp excels for backpackers who need lightweight shade. The 210D Oxford fabric with PU 3000mm waterproof rating provides excellent rain and sun protection in a 2.2-pound package.
The reflective inner coating does double duty: it blocks light and helps retain heat in cold weather. I've used reflective tarps in shoulder season and noticed the temperature difference inside.

Eight reinforced fix points with triangle dual-layer construction give you versatile setup options. User photos show this configured in various pitch styles including A-frame and diamond setups.
Tarp Features
🔥 Reflective Coating
📌 8 Tie-outs
Unigear includes quality aluminum stakes and guy lines with retro-reflective striping. Many tarps cheap out on accessories, but these are actually usable right out of the package.
The 9.8 x 9.8 foot size works well for solo or two-person tents. For larger family tents, consider sizing up or using multiple tarps for full coverage.
How to Set Up a Tarp Shield?
Building an effective tarp shield requires attention to airflow. Here's my proven method:
- Choose tarp size - Your tarp should extend at least 2 feet beyond your tent on all sides for proper coverage.
- Find anchor points - Look for trees, rocks, or use your own stakes. Natural anchors save weight but limit site selection.
- Suspend above tent - Set up your tarp first, then pitch your tent underneath. The tarp should be 2-3 feet above your tent at the lowest point.
- Secure with guy lines - Use the included ropes or add your own. Tight lines prevent sagging and maintain consistent shade.
- Ensure airflow gap - Critical: leave space between tarp edges and ground. This gap prevents heat buildup and allows cross-breezes.
I've made the mistake of draping a tarp too low and created a sauna inside. The air gap is non-negotiable for comfort. You want shade, not a solar oven.
Method 4: Strategic Tent Positioning
This free method can buy you an extra hour of sleep with zero investment. The key is understanding how sunlight moves across your campsite.
Orient Away from Sunrise
The most effective positioning technique is simple: face your tent door away from the direction the sun rises. In North America, this generally means positioning your tent facing west or northwest.
I've camped at sites where proper orientation alone bought me an extra hour of sleep. The difference between east-facing and west-facing tent placement can be sunrise at 6 AM versus meaningful light at 7 AM.
Use Natural Shade
Trees, cliffs, and vegetation create natural shade patterns. Arrive before sunset if possible to observe how shadows move across the campsite.
Look for locations that will be shaded during morning hours but might get sun later in the day. This helps warm your tent after you're ready to wake up.
Pro Tip: Deciduous trees provide dappled shade that's cooler than direct sun but may allow more light through. Conifers offer denser shade for darker conditions.
Elevation and Terrain
Higher terrain like ridges gets sun earlier. Valleys and depressions stay darker longer as the sun needs to clear surrounding elevations.
I once camped in a small depression and didn't see direct sun until 45 minutes after the official sunrise time. Every minute counts when you're trying to sleep in.
Troubleshooting Common Issues
Blackout solutions create new challenges. Here's how to handle the most common problems:
Ventilation Concerns
Blocking light often means blocking airflow. Combat this by opening any vents that don't face the sunrise direction. Blackout tents usually have covered vents designed for this exact scenario.
Condensation Buildup
More coverage can mean more condensation. I've found that maintaining airflow through low vents while covering upper areas strikes the best balance. Don't seal every opening or you'll wake up to a damp interior.
Heat Management
Blackout materials absorb heat. The silver coating on many blackout products reflects this, but proper ventilation remains crucial. Consider that a blackout tent might be darker but warmer - sometimes a fair trade.
Frequently Asked Questions
What is the best way to shade a tent?
The most effective way to shade a tent is suspending a tarp 2-3 feet above it to create an air gap while blocking direct sunlight. This dual-purpose approach also reduces interior temperature. Blackout tents provide the most complete light blocking. Strategic positioning using natural shade costs nothing but requires planning your campsite carefully.
Can I dye my tent black?
No, dyeing a tent black won't work. Modern tents are designed with waterproof coatings and DWR treatments that prevent liquid absorption, so dye won't penetrate the fabric. Instead, use blackout liners inside your tent or invest in a blackout tent with purpose-built light-blocking technology.
What are the downsides of blackout tents?
Blackout tents cost more than standard tents, typically $150-200 versus $80-150 for similar non-blackout models. The dark exterior can absorb more heat in sunny weather. Some blackout materials add weight, though modern versions are quite reasonable. The reduced natural light can make finding items harder inside the tent.
Do blackout tents really work?
Yes, blackout tents with technologies like Coleman's Dark Room feature block 90-99% of sunlight, creating near-total darkness inside. I've personally slept past 8 AM in these tents during summer when the sun rose before 6 AM. User reviews consistently praise the ability to sleep in past sunrise, especially for families with children.
Will blackout fabric make my tent too hot?
Blackout fabric can increase heat, but quality blackout tents use coatings that reflect rather than just absorb sunlight. The key is maintaining ventilation through covered vents. For liners, choose breathable blackout material rather than solid plastic sheets. A tarp shield actually cools your tent by blocking direct sun before it reaches your tent fabric.
The Final Verdict
After testing blackout methods across multiple camping seasons, here's what I recommend for different situations:
- 🏆 Best Overall: Coleman Sundome Dark Room - Reliable 90% light blocking at a reasonable price with proven weather protection.
- 👨👩👧👦 Best for Families: Coleman Carlsbad with Screen Porch - Blackout sleeping area plus bug-free storage space.
- 💸 Best Budget: SUSNID Portable Blackout Curtains - Transform any tent for under $10.
- 🏃 Best Backpacking: Night Cat Blackout Cabin - Lightest blackout tent option at 14.3 pounds.
- 🛡️ Best Tarp: Amazon Basics Waterproof Tarp - Versatile shade and rain protection at an unbeatable price.
Pro Tip: Combine methods for maximum effectiveness. A tarp shield over a blackout tent creates the darkest, coolest sleeping environment possible.
![Women's Hiking Boot Guide: 8 Best Boots Tested in [cy]](https://www.aquamarinepower.com/wp-content/uploads/2026/07/featured-update-19403-1784613974356-300x225.jpg)
![Best Bushcraft Pants [cy]: Complete Guide](https://www.aquamarinepower.com/wp-content/uploads/2026/07/featured-update-19082-1784613963232-300x225.jpg)