A dull pocket knife is frustrating and dangerous. When your blade struggles to cut, you apply more pressure and increase the risk of slipping.
Learning to sharpen your own knife saves money and gives you control over your gear. I've been sharpening my own knives for over 15 years, and after struggling through the learning curve, I can now put a razor edge on any blade in under 15 minutes.
Sharpening a pocket knife is straightforward once you understand the basics: clean the blade, prepare your stone, maintain a consistent 15-20 degree angle, sharpen both sides until a burr forms, remove the burr, and strop for a polished edge. The entire process takes 15-30 minutes for beginners.
The secret isn't expensive equipment. It's consistency and patience. I've seen people ruin good knives with $200 sharpening systems, while others achieve mirror finishes on a $25 whetstone.
This guide works for any pocket knife, whether you carry an EDC folder, a traditional slipjoint, or a heavy-duty fixed blade. Follow these six steps and you'll have a shaving-sharp edge by the end of the session.
What You'll Need to Sharpen Your Pocket Knife?
You don't need a professional setup to get started. Here's the essential equipment:
- Sharpening stone: A whetstone with 400-1000 grit on one side and 3000-8000 on the other covers everything from dull blades to final polishing
- Lubricant: Water for water stones, honing oil for oil stones, or water for diamond stones
- Clean cloth: For wiping the blade and cleaning your stone
- Angle guide (optional): Helps beginners maintain consistent angle
- Leather strop (optional): For final edge polishing
- Honing rod (optional): For quick touch-ups between sharpening sessions
When I started, I used a cheap combination stone from a hardware store. It worked fine. Don't let equipment anxiety stop you from beginning.
Quick Summary: Total investment for a complete beginner setup runs $30-80. You can spend more, but diminishing returns kick in quickly past $100 unless you're pursuing professional-level results.
Sharpening Tools We Recommend
Best Complete Beginner Kit

Intelitopia Complete Knife Sharpening Stone Set...
Type: 4-Grit Whetstone
Grit: 400/1000/3000/8000
Includes: Leather strop,Flattening stone,Angle guide,Bamboo base
What we like
- Complete kit with 4 grits
- Leather strop included
- Non-slip base
- Angle guide for beginners
- Good value for money
What could be better
- Stones require 10min soak
- Base takes up counter space
The Intelitopia set covers the entire sharpening process from repairing a damaged edge to putting a mirror finish on a blade. I appreciate that they include a flattening stone, which most beginner kits skip. Keeping your stones flat is essential for consistent results.
Understanding Sharpening Basics Before You Start
Sharpening Angle: The angle at which the blade meets the sharpening stone. Most pocket knives perform best at 15-20 degrees. Lower angles create sharper but more fragile edges; higher angles are more durable but less sharp.
Sharpening removes metal to create a new edge. Honing realigns the existing edge without removing significant metal. You hone frequently but sharpen only when the edge is genuinely dull.
Burr: A thin ridge of metal that forms on the opposite side of the blade edge during sharpening. Feeling the burr means you've removed enough metal at that point along the edge. Removing the burr is essential for a finished edge.
Most pocket knives come from the factory with a bevel around 20 degrees per side. Unless you have a specific reason to change it, stick close to the factory angle.
I learned this lesson the Hard way. I tried to put a 15-degree edge on a heavy camp knife meant for chopping. The edge folded like paper the first time I used it. Match the angle to the knife's intended use.
Step 1: Clean and Inspect Your Blade
Start by cleaning your blade thoroughly with warm soapy water to remove dirt, oil, and debris that could scratch your sharpening stone. A clean blade lets you feel the burr formation accurately and prevents contamination of your stone.
Before you start sharpening, clean the blade with warm water and dish soap. Dirt, sap, or old oil on the blade will transfer to your stone and create scratches.
While cleaning, inspect the edge for damage. Look for chips, rolls, or severely dulled sections. A slightly rolled edge can be sharpened out. Chips deeper than 1mm might require aggressive work on a coarse stone or professional regrinding.
Dry the blade completely. Water on the steel can interfere with feeling the burr as you sharpen.
Safety note: Always keep the blade pointed away from your body. Work on a stable surface at a comfortable height. I've had a knife slip off an unstable table, and it's not an experience I want to repeat.
Step 2: Prepare Your Sharpening Stone
Prepare your stone by soaking water stones for 5-10 minutes until bubbles stop rising, or apply a few drops of honing oil to oil stones. Diamond stones just need water. Place the stone on a non-slip base or damp towel for stability during sharpening.
Water stones need to soak until they're fully saturated, usually 5-10 minutes. You'll know they're ready when bubbles stop rising. Oil stones need just a few drops of honing oil spread across the surface.
Diamond stones are the easiest: just splash some water on the surface and you're ready. Don't use oil on diamond stones; it can clog the surface.
Place your stone on a stable surface. Most stones come with a rubber base. If yours doesn't, put it on a damp towel or non-slip mat. A moving stone while you're sharpening is dangerous and ineffective.
For a dull blade, start with the coarse side (400-1000 grit). If you're just touching up an edge that's slightly dull, you can start with a medium grit (2000-3000).
Step 3: Find the Correct Sharpening Angle
Hold the blade against the stone at a 15-20 degree angle. A simple trick: place a matchstick under the spine of the blade, lower the edge until it touches the stone, then remove the matchstick. That height is approximately 20 degrees for most pocket knives.
Consistent angle is the most critical factor in sharpening. Hold the wrong angle perfectly, and you'll eventually get a sharp edge. Vary the angle, and you'll create a rounded, dull edge.
Here's a visualization: imagine slicing a thin layer off the top of the stone. Too steep and you're scraping the stone; too shallow and you're polishing the side of the blade without touching the edge.
Quick Summary: Most pocket knives work best at 17-20 degrees per side. Heavy-duty folders can go to 22-25 degrees for durability. Delicate EDC knives might perform well at 15 degrees for extra sharpness.
If you struggle with freehand sharpening, an angle guide clips onto the blade and maintains consistency. I used one for my first six months of sharpening. It's not cheating; it's training your muscle memory.
Step 4: Sharpen the First Side
Using smooth, consistent strokes, draw the blade across the stone from heel to tip while maintaining your 15-20 degree angle. Apply moderate pressure and use the full length of the stone. Make 10-15 strokes on one side before switching.
Start with the blade heel at the near edge of the stone. Draw the blade toward you while simultaneously moving it sideways so the entire edge contacts the stone from heel to tip.
The motion should feel like you're slicing a very thin layer off the stone's surface. Don't press down hard; let the stone do the work. Heavy pressure creates deep scratches that are hard to remove later.
I use a pattern: 10 strokes, then check my work. Feel for a burr along the opposite edge by running your thumb gently perpendicular to the edge (not parallel along it). If you feel a slight catch or roughness, the burr is forming.
For left-handed sharpeners: The technique is identical, but your hand position will be mirror image. Some lefties prefer pushing the blade away rather than pulling toward. Either works as long as the angle stays consistent.
Step 5: Sharpen the Second Side and Remove the Burr
Flip the knife and sharpen the other side using the same technique. Alternate sides every 5-10 strokes until you feel a burr along the entire edge on both sides. Then make 2-3 very light alternating passes to remove the burr and refine the edge.
After sharpening the first side, flip the knife and repeat the process on the second side. The goal is to raise a burr along the entire length of the edge on both sides.
Once the burr is fully formed, it's time to remove it. Make light alternating strokes, gradually reducing pressure. Some sharpeners recommend finishing on the finer side of your stone at this point.
Test for burr removal by carefully feeling the edge from both sides. It should feel smooth and uniform, no rough patches or catches.
Quick Summary: The burr is your friend. It tells you when you've sharpened enough at each point along the edge. Don't rush burr removal; this is where most beginners create uneven edges.
For a truly polished edge, progress through higher grits. Move from your coarse stone to a medium (2000-3000), then to a fine (5000-8000). Each grit removes the scratches from the previous one and refines the edge further.
Step 6: Strop for a Razor-Sharp Edge
Draw the blade spine-first across a leather strop with the edge trailing behind. Use light pressure and alternate sides with each pass. Stropping aligns the microscopic teeth of the edge and removes any remaining burr for a razor-sharp finish.
Stropping is the final polish that takes your edge from sharp to scary sharp. It realigns the microscopic edge rather than removing metal.
Hold the strop taut or anchor it firmly. Place the blade on the strop with the spine leading and the edge trailing. This is opposite to sharpening direction and is critical for safety.
Draw the blade across the leather while maintaining the same angle you used for sharpening. Flip and repeat on the other side. 10-20 passes per side is usually sufficient.
You can use stropping compound (a fine abrasive) for faster results. I recommend starting without compound to learn the technique, then adding it later if desired.
Emergency stropping: In a pinch, a leather belt or even cardboard can work as a strop. It won't match proper leather, but it's better than nothing for field touch-ups.
How to Test if Your Knife Is Sharp Enough?
A properly sharpened pocket knife should cleanly slice through a sheet of printer paper with minimal effort. For a more demanding test, try shaving hair from your arm or whittling the tip of a pine twig. A sharp knife will create translucent paper shavings.
- Paper test: Hold a sheet of printer paper by one corner. Slice through it with the knife, drawing the blade toward you. A sharp knife cuts cleanly with a smooth sound. A dull knife tears or requires sawing motion.
- Arm hair test: With the blade perpendicular to your skin, lightly shave arm hair. A truly sharp knife will mow hair with almost no pressure. Be careful; this test isn't for beginners.
- Tomato test: Slicing a ripe tomato requires zero pressure with a sharp knife. The blade should glide through under its own weight.
- Thumbnail test: Lightly drag the edge across your thumbnail at a 90-degree angle. A sharp edge will catch slightly; a dull edge will slide.
Don't be discouraged if your knife fails these tests on your first attempt. Sharpening is a skill that develops with practice. My first dozen attempts produced marginally better edges than when I started.
More Sharpening Tools We Recommend
Best Guided System for Consistent Results
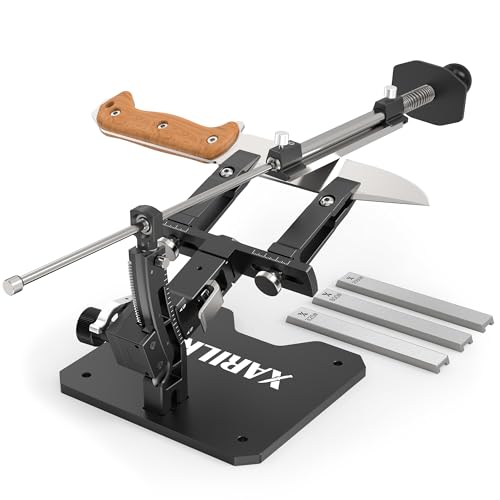
XARILK GEN3 Guided Knife Sharpening System...
Type: Guided Sharpening System
Plates: 3 Diamond (320/800/2000)
Construction: Aluminum body
Features: Adjustable angle,Consistent results,Professional grade
What we like
- Guided system ensures consistent angle
- Diamond plates cut fast
- Aluminum build is durable
- No water soaking needed
- Repeatable results every time
What could be better
- Higher price point
- Limited to 3 grit plates
- Takes time to set up
The XARILK GEN3 solves the biggest challenge in sharpening: angle consistency. I recommend guided systems to anyone who's struggled with freehand sharpening. They're nearly foolproof and produce repeatable results.
The diamond plates cut much faster than whetstones, which means less time sharpening and more time using your knife. The aluminum body feels solid and won't flex under pressure.
Best for Quick Edge Maintenance
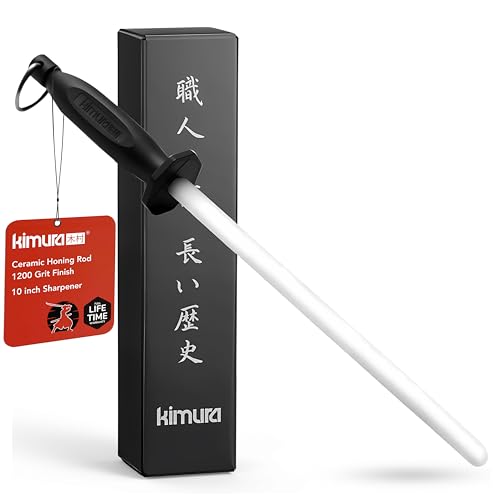
Kimura Professional Ceramic Honing Rod, 10 inch...
Type: Ceramic Honing Rod
Length: 10 inches
Grit: 1200
Features: Ergonomic handle,Balanced design,Japanese gift box
What we like
- Quick touch-ups between sharpening
- Restores edge without removing metal
- Comfortable handle
- Quality ceramic
- Beautiful presentation
What could be better
- Won't sharpen a dull blade
- Ceramic can break if dropped
- Requires careful storage
A honing rod doesn't sharpen; it realigns. Use it weekly or whenever your knife feels slightly off. It extends the time between full sharpening sessions significantly.
I keep this Kimura rod on my kitchen counter. A few passes before food prep keeps my knives performing well without dragging out the sharpening stones.
Maintenance Tips to Keep Your Edge Longer
Extend your edge life by honing weekly with a ceramic rod, storing your knife clean and dry, and using appropriate cutting surfaces. A sharp knife on wood or plastic stays sharp 3-4 times longer than one used on glass, stone, or metal surfaces.
Proper maintenance dramatically reduces how often you need to sharpen. I hone my EDC knife weekly and only do a full sharpening every 3-4 months with daily use.
Store your knife clean and dry. Moisture causes corrosion, and dirt accelerates edge wear. A quick wipe with an oily cloth after use provides protection and lubrication.
Cutting surface matters more than most people realize. Wood or plastic cutting boards are gentle on edges. Glass, stone, or ceramic counters will dull a sharp knife in seconds. I learned this after ruining a freshly sharpened blade on a granite countertop.
Use the right tool for the job. Your pocket knife isn't a pry bar, a screwdriver, or a can opener. Abuse the edge and you'll be sharpening constantly.
Quick Summary: With proper care, a well-sharpened pocket knife should stay sharp for 2-4 months of regular EDC use. Heavy use on hard materials might require monthly sharpening. Occasional users might go 6-12 months between sessions.
Frequently Asked Questions
What is the best angle to sharpen a pocket knife?
The optimal angle for most pocket knives is 15-20 degrees per side. Lower angles (15 degrees) create razor-sharp edges that are more fragile, while higher angles (20-25 degrees) provide durable edges that hold up better to heavy use. Match the angle to your knife's intended purpose.
How often should I sharpen my pocket knife?
Sharpen your knife when it no longer easily cuts through paper. For regular daily users, this typically means every 2-4 months. Use a honing rod weekly between sharpening sessions to maintain the edge. Occasional users might only need to sharpen once or twice a year.
What grit sharpening stone should I use?
Start with 400-800 grit for dull or damaged edges to remove material quickly. Progress to 1000-3000 grit for refining the edge. Finish with 5000-8000 grit for polishing. A combination stone with 1000/6000 grit covers most needs for pocket knife maintenance.
What is the difference between honing and sharpening?
Sharpening removes metal to create a new cutting edge. Honing realigns the existing edge without removing significant material. You should hone frequently (weekly) to maintain your edge, but only sharpen when the blade is genuinely dull (every few months depending on use).
Can you sharpen a knife with a rock?
Yes, in an emergency you can sharpen with a smooth, fine-grained river rock. Find a flat section, wet it with water, and use the same technique as a whetstone. The results won't match proper stones, but it's better than nothing for field sharpening when you have no other options.
Do you push or pull when sharpening a knife?
Most sharpeners pull the blade toward them while moving it sideways across the stone. This gives good control and visibility. The direction matters less than maintaining consistent angle and pressure. Whether you push or pull, keep the motion smooth and use the full stone surface.
Final Thoughts
Sharpening your own pocket knife is a skill that pays dividends for life. After 15 years of sharpening, I still find satisfaction in transforming a dull blade into a precision cutting tool.
Start with a budget whetstone and practice on an inexpensive knife. Don't expect perfection immediately. My first dozen attempts produced mixed results, but each session taught me something about feel and consistency.
The six-step process in this guide will give you a working sharp edge. Refinement comes with time. Focus on angle consistency above all else, and you'll be ahead of most beginners.
Your pocket knife is one of the most useful tools you carry. Keeping it sharp isn't just about performance; it's about safety and respect for the craft.
![Women's Hiking Boot Guide: 8 Best Boots Tested in [cy]](https://www.aquamarinepower.com/wp-content/uploads/2026/07/featured-update-19403-1784613974356-300x225.jpg)
![Fleece vs Polyester: The Complete Fabric Comparison Guide [cy]](https://www.aquamarinepower.com/wp-content/uploads/2026/07/featured-update-19164-1784613967412-300x225.jpg)
![Best Bushcraft Pants [cy]: Complete Guide](https://www.aquamarinepower.com/wp-content/uploads/2026/07/featured-update-19082-1784613963232-300x225.jpg)